exFAT2 IP for Gen4 Demo Instruction
2.1 Format/Secure Format Command
2.2.3 Mixed Write/Read File Command
3.1 Abort for Write file command
3.2 Abort for Read file command
1 Overview
Users can test the functionality of the following six commands through the test menu: Format, Secure Format, Write file, Read file, Read file info, and Shutdown. In a multi-user configuration, the Read file and Read file info commands can be executed concurrently for two users. However, the Format, Secure Format, Write file, and Shutdown commands are exclusive to User#0.
Begin by setting up the FPGA board and test system as per the instructions in the ôdg_nvmeip_fpgasetupö document. Access this document at the following link.
https://dgway.com/products/IP/NVMe-IP/dg_nvmeip_fpgasetup_xilinx_en/
Upon the completion of configuration file downloading to the FPGA, a welcome message will appear, as illustrated in Figure 1‑1.
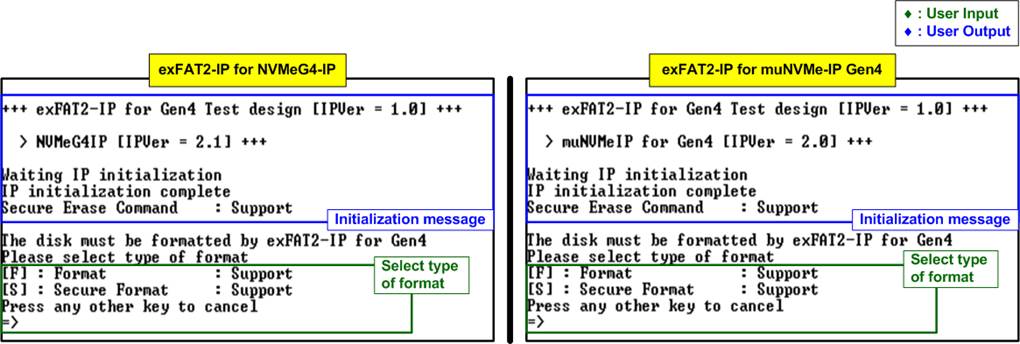
Figure 1‑1 exFAT2-IP initialization message
This welcome screen outlines the IPĺs name, version number, a confirmation of the completion for IP initialization, and the SSDĺs Secure Erase command compatibility. Users are prompted to format the disk, with three options: Format (F), Secure Format (S), or bypass the formatting process (other keys). In specific SSD that does not support Secure Erase command, the Secure Format cannot be executed.
For SSDs not previously formatted by the exFAT2-IP, selection of Format or Secure Format is mandatory. Subsequent to formatting, disk system information is displayed, such as file size, maximum number of files in the disk, maximum number of files for each directory, and total number of available files in the disk, as shown in Figure 1‑2. The IP then enters a ready state for command input.
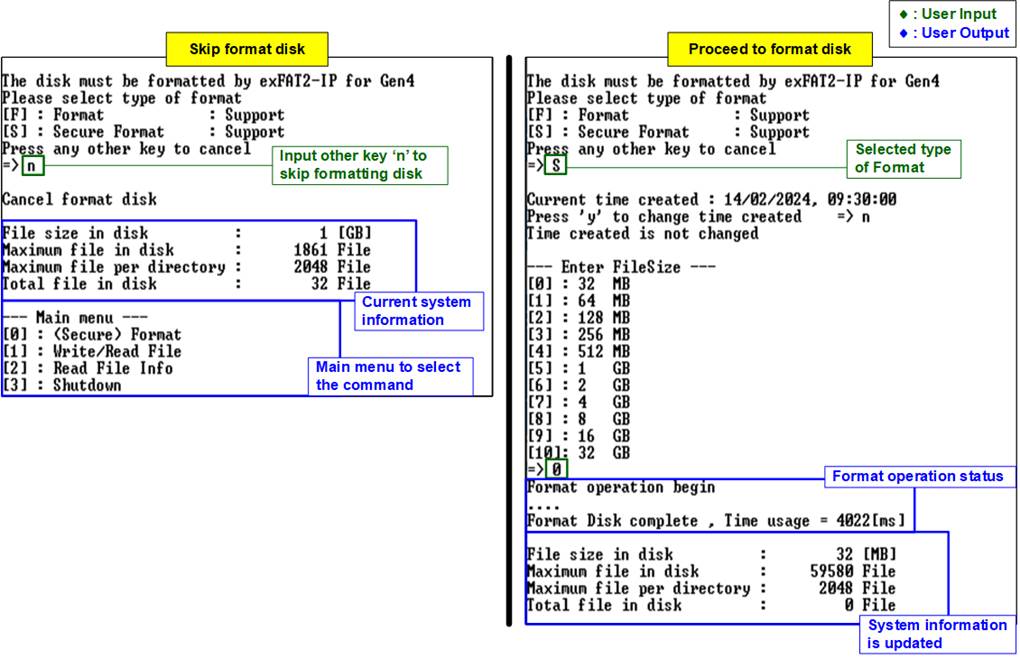
Figure 1‑2 Initialization complete with and without Format operation
The main menu presents four options for interacting with the exFAT2-IP. Detailed explanations of each menu item will follow in subsequent sections.
2 Test Menu
2.1 Format/Secure Format Command
Select Ĺ0ĺ from the main menu to initiate the Format process of exFAT2-IP. The console will present two formatting options: Format and Secure Format. It will also indicate whether the disk supports these commands.
a) Format Command: Executes standard formatting.
b) Secure Format Command: Include an erase operation ensuring all deleted data is irrecoverable, addressing security concerns. On certain SSDs, this function can also enhance transfer performance, which might decrease after extensive data storage.
Execution steps for Format and Secure Format are as follows.
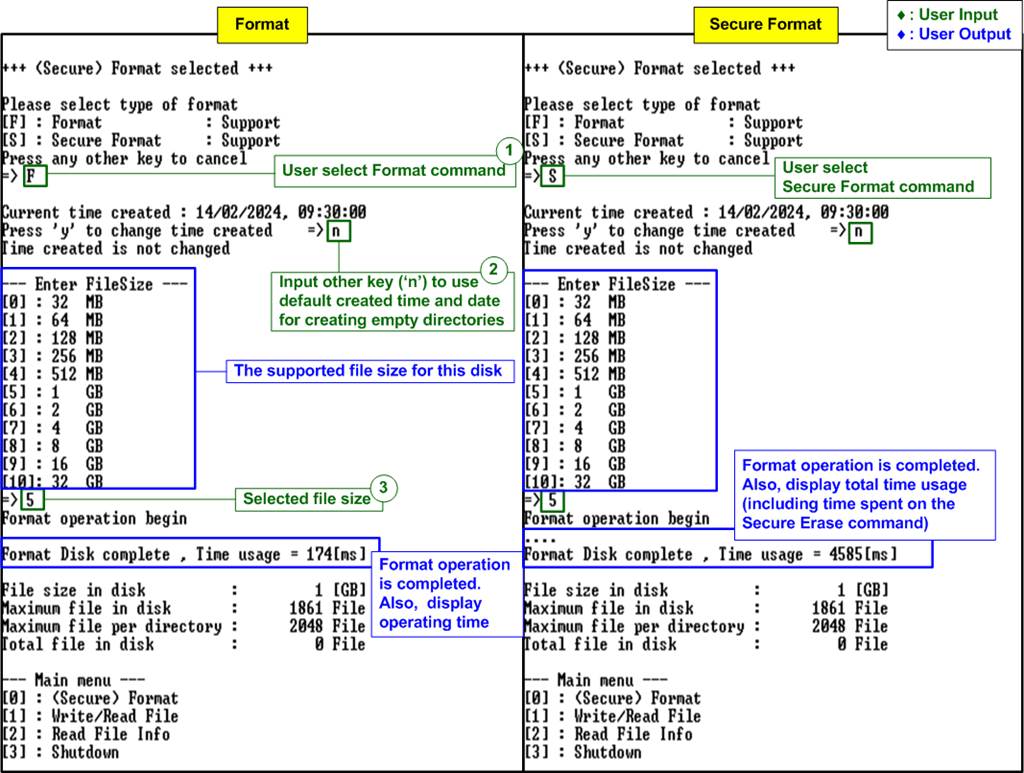
Figure 2‑1 (Secure) Format menu
1) Select Format Type:
a) Press ĹFĺ for Format.
b) Press ĹSĺ for Secure Format.
c) Press any other key to cancel the command. The action cancels the Ĺ(Secure) Formatĺ submenu and returns you to the main menu.
If a Format option is selected, the system will display the default created date and time for empty directories formed created during the process
2) Set Created Date and Time:
a) Press Ĺyĺ to input a new created date and time.
b) Press any other key (e.g., Ĺnĺ) to retain the default values.
After setting the date and time, the console will list all supported file sizes for the disk.
3) Select the diskĺs file size from the provided options. After a valid selection, Format or Secure Format process will begin.
During the (Secure) Format operation, the message ôFormat operation beginö will appear. The operationĺs progress is indicated by a dot (.) printed on the console. Upon completion, ôFormat disk completeö will be displayed, along with the total duration of the format process.
Note: As illustrated in Figure 2‑1, the Secure Format typically takes longer than the standard Format due to the additional erase operation.
Upon successfully formatting a disk with exFAT2-IP and connecting it to a PC, the system recognizes the DG_exFAT drive, displaying 512 empty directories ranging from DIR000 (the first directory) to DIR1FF (the 512th directory). The modified date of these directories matches the created date specified during the formatting process.
Note: When the formatted disk is connected to a PC, avoid creating, writing to, or modifying data on the disk. Any such modifications necessitate reformatting the disk with exFAT2-IP.
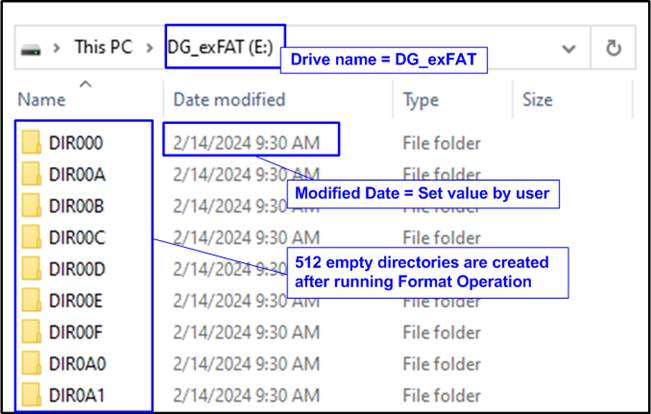
Figure 2‑2 512 Empty directories after the Format completion
If an incorrect file size is entered during the formatting process, and error message will appear, and the Format process will be aborted, as illustrated in Figure 2‑3.
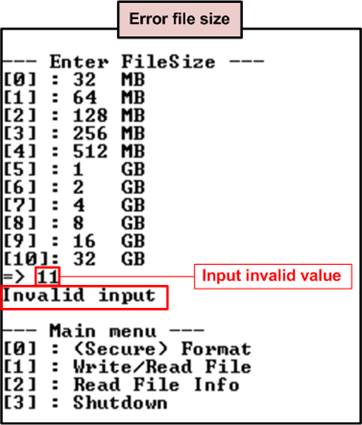
Figure 2‑3 Error message when an invalid file size is received
2.2 Write / Read File Command
Select option Ĺ1ĺ to initiate the Write/Read file operation. This functionality supports both single-user and two-user modes, enabled through connections with NVMe-IP and muNVMe-IP, respectively. In this setup, User#0 has the flexibility to execute both Write and Read file commands, whereas User#1 is limited to the Read file command.
The system allows for separate configuration of test parameters for User#0 and User#1, accommodating diverse data transfer rate requirements. This feature is particularly useful for emulating real-world conditions where data sources exhibit varied transfer rates or when monitoring systems require data at reduced speeds.
This section will illustrate three examples to showcase the commandĺs versatility: Write file command executed by User#0, Read file command executed by both single user and two users, and combined Write-Read file operation illustrating simultaneous actions.
2.2.1 Write File Command
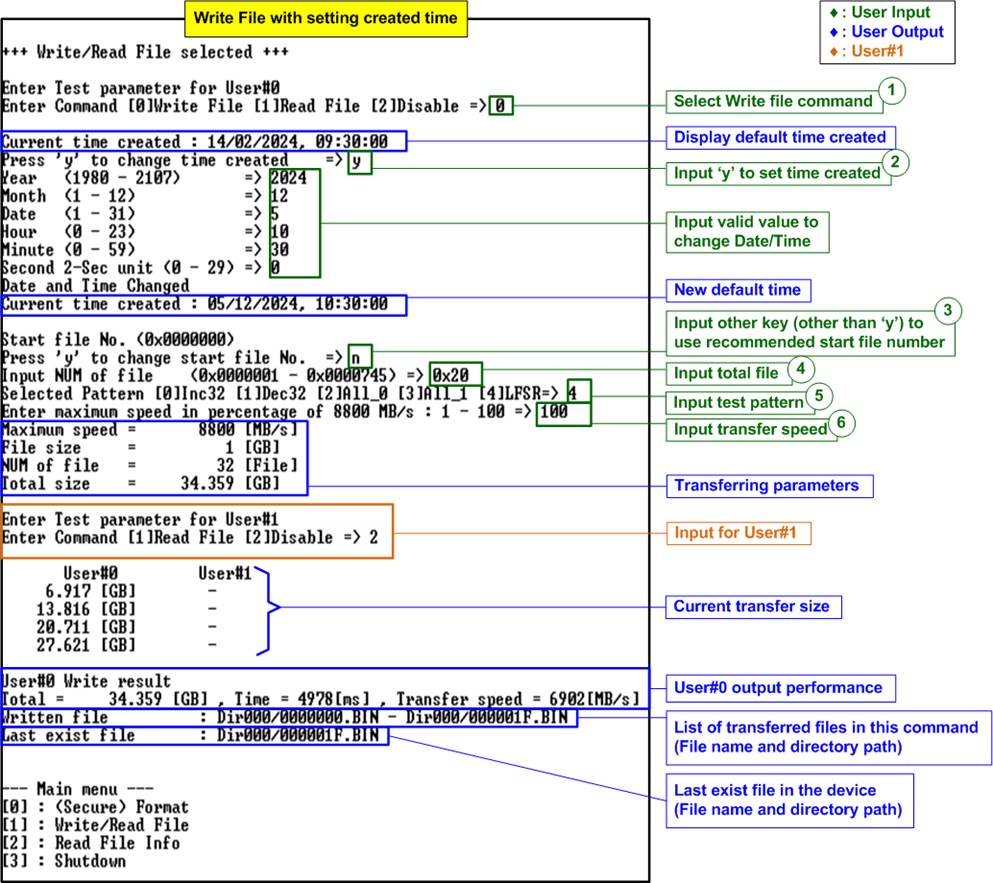
Figure 2‑4 Write file with setting created time
Refer to Figure 2‑4 for a step-by-step guide on executing the Write file command, which requires six input parameters.
1) Command Selection: For User#0, choose from three options: [0]-Write File, [1]-Read File, or [2]-Disable. Select Ĺ0ĺ to initiate the Write file command. After that, the console will display the most recent create date and time.
b) Month : Range 1 ľ 12.
c) Date : Range 1 ľ 31.
d) Hour : Range 0 ľ 23.
e) Minute : Range 0 ľ 59.
f) Second : Second multiplied by 2, range 0 ľ 29.
Use decimal as default; prefix ô0xö for hexadecimal. Invalid inputs will be ignored, keeping the previous value. A ôDate and Time changedö confirmation message will show the new value. Subsequently, the console will suggest a start file number based on the last Write file command.
4) Number of files: Specify the total number of files to be written. Input decimal value or prefix ô0xö for hexadecimal.
5) Test pattern: Choose from 32-bit incremental, 32-bit decremental, all-0, all-1, and 32-bit LFSR counter.
6) Maximum speed: Set as a percentage of 8,800 MB/s, with valid inputs ranging from 1 to 100. The 8,800 MB/s is derived from the user clock frequency (275 MHz) multiplied by the data width (256 bits).
If a multi-user setup is used, repeat steps 1) ľ 6) of User#1, noting that User#1 can only execute the Read file command.
After the Write file command concludes, the data is stored on the SSD in file format, with names spanning from the first file number (set in step 3) to the last file number (Start file number + Number of files ľ 1). The file name is defined by seven hexadecimal digits. Since the number of files per directory is limited, new files might be distributed across directories. The console will display the names and directory paths of the new files as a concluding message.
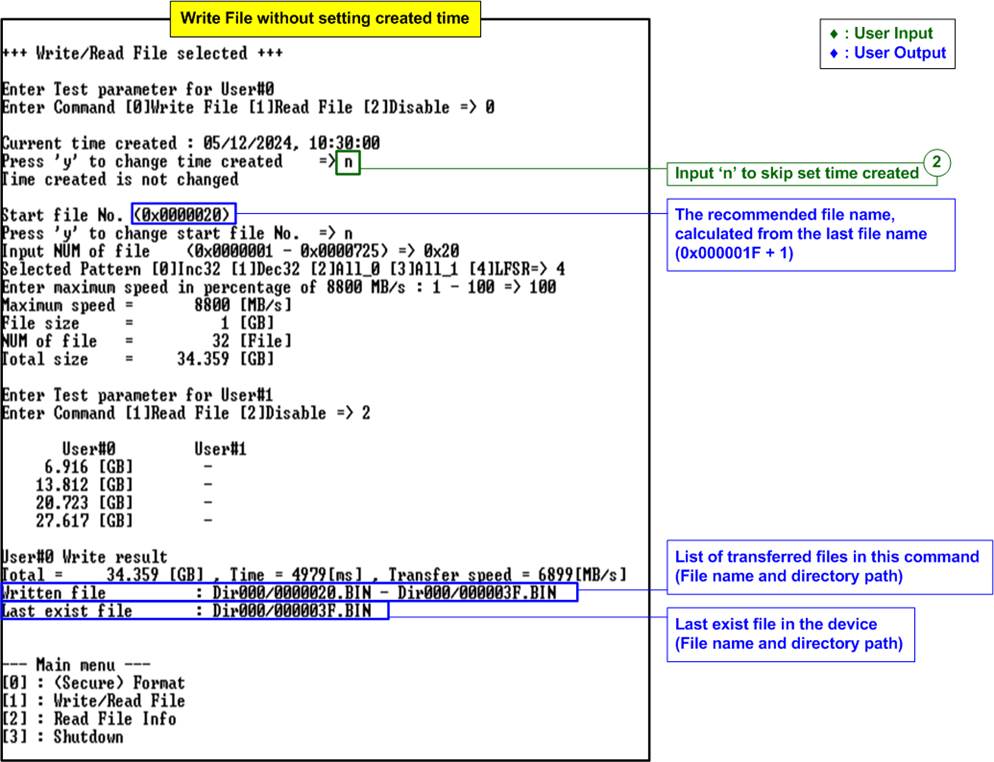
Figure 2‑5 Write file without setting created time
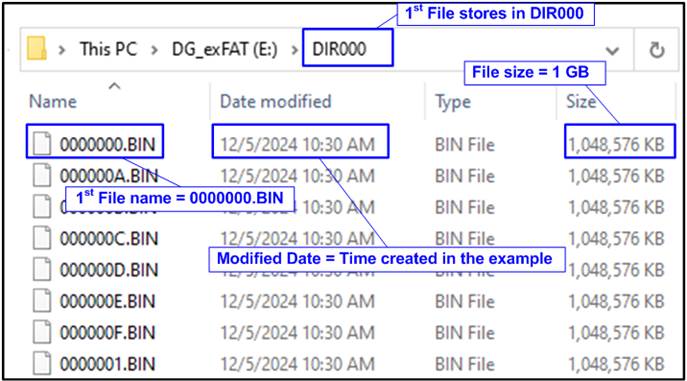
Figure 2‑6 Example test file written by Write file command
Note: Please refrain from creating, writing, or modifying data on the SSD
when it is connected to a PC. If any modifications occur, the SSD will require
reformatting with exFAT2-IP to maintain integrity.
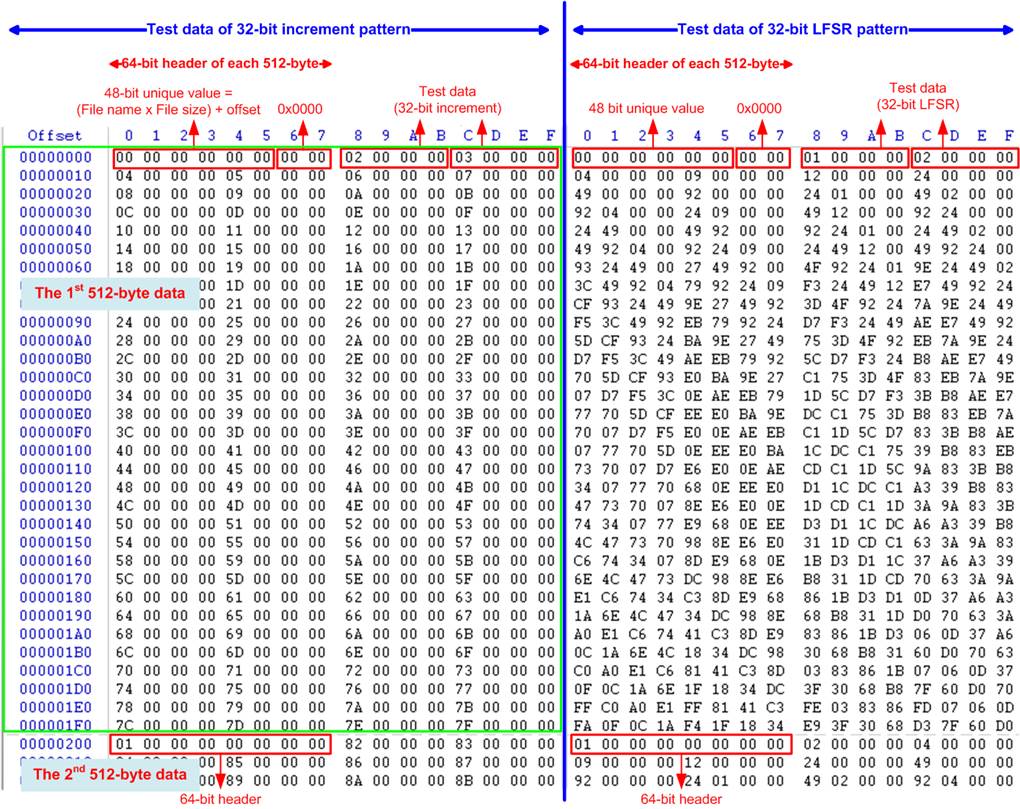
Figure 2‑7 Test data in sector#0 - #1 of file ô0000000.BINö by increment/LFSR pattern
Test data is split into 512-byte segments. For incremental, decremental, or LFSR pattern, each segment includes a unique 64-bit header consisting of a 48-bit address (derived from <file name x file size> + file offset) and 16-bit zero value, ensuring a distinct address for every 512-byte segment. The unique header is not included in the all-0 or all-1 patterns.
The data following the 64-bit header will display the selected test pattern. For instance, in Figure 2‑7, the left window illustrates data in file Ĺ0000000.BINĺ with an incremental pattern, while the right window depicts the LFSR pattern. The header (byte#0-byte#7) remains consistent across test patterns, followed by the specific test data (incremental, decremental, and LFSR).
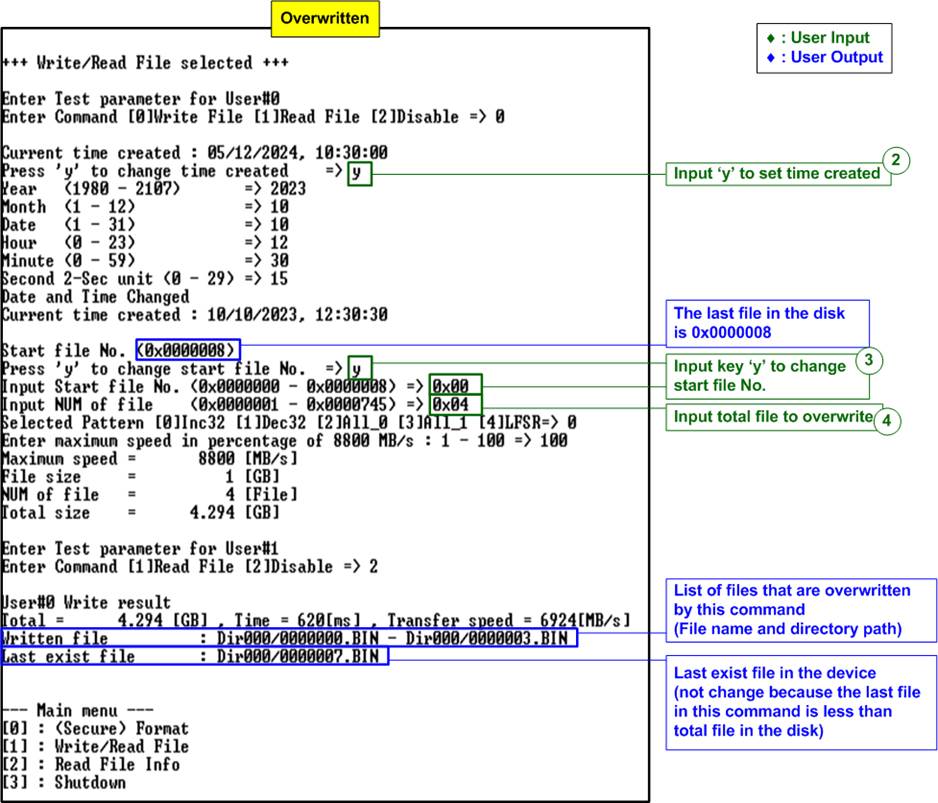
Figure 2‑8 Set new time created and new file start No. to overwrite file
Figure 2‑8 illustrates an example of overwriting files by setting the Start file number to value less than the default settings. Initially, the last file on the SSD is Ĺ0000007.BINĺ. However, the overwrite operation writes files Ĺ0000000.BINĺ through Ĺ0000003.BINĺ for rewriting. During this operation, the created date and time is set to new value (10 Oct 2023, 12.30.30), which deviates from the default created date.
Upon completing this operation, the modified date for files Ĺ0000000.BINĺ to Ĺ0000003.BINĺ is updated to reflect the newly set date of 10 Oct 2023, 12.30.30. Since the last file number in this overwrite command (0000003.BIN) is lower than the last file on the SSD (0000007.BIN), the display of the last file on the console remains unchanged, as detailed in Figure 2‑9.
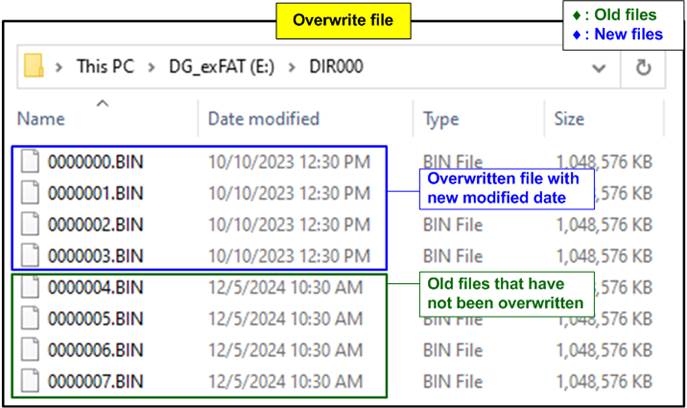
Figure 2‑9 The overwritten file with new modified date
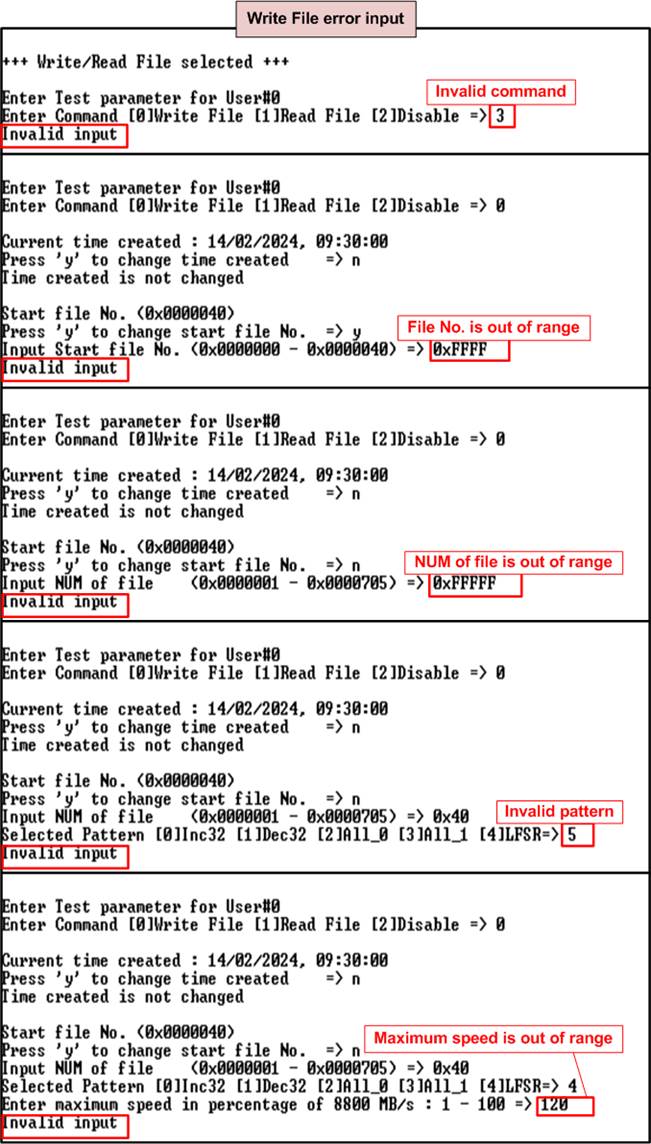
Figure 2‑10 Error massage from invalid input of the Write file command
2.2.2 Read File Command
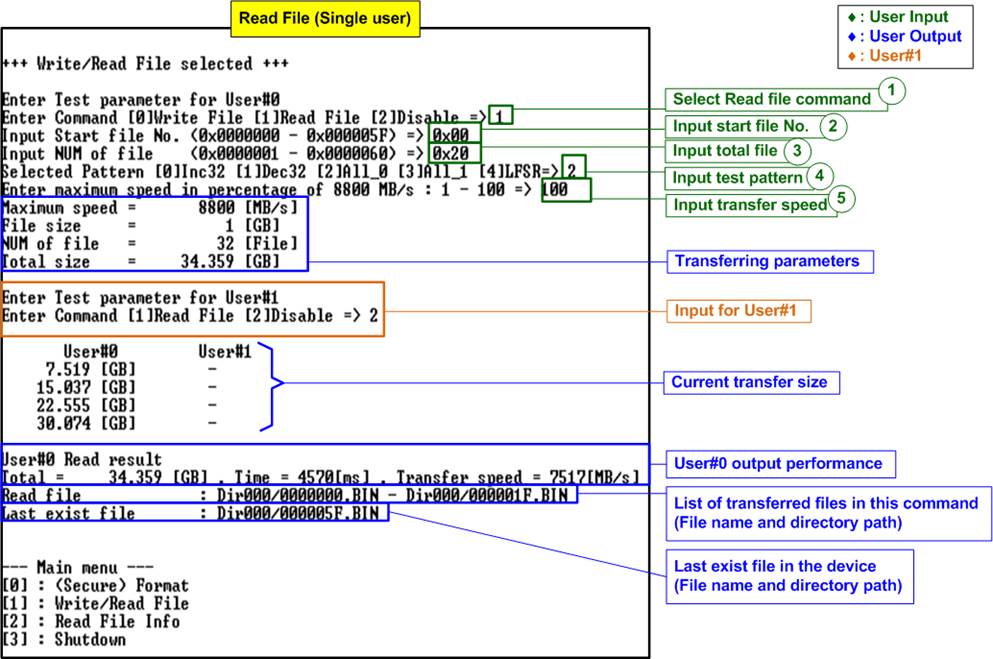
Figure 2‑11 Read file command by one-user
To execute the Read file command, the user need to input the following five parameters.
1) Command Selection: For User#0, there are three options: [0]-Write File, [1]-Read File, or [2]-Disable. Choose Ĺ1ĺ to initiate the Read file command.
2) Start file number: Set the starting file number for the read operation, within the range of 0 to (total number of files on the disk ľ 1). Default input is decimal as default; use prefix ô0xö for hexadecimal.
3) Number of files: Specify the total number of files to read. Enter a decimal value or prefix with ô0xö for hexadecimal input.
4) Test pattern: Select a verification pattern that corresponds with the one used in the Write file command. Five options include 32-bit incremental, 32-bit decremental, all-0, all-1, and 32-bit LFSR counter.
5) Maximum speed: Define the speed as a percentage of 8,800 MB/s, with valid inputs ranging from 1 to 100.
For multi-user configurations, repeat steps 1) ľ 5) to initiate the Read file command for User#1.
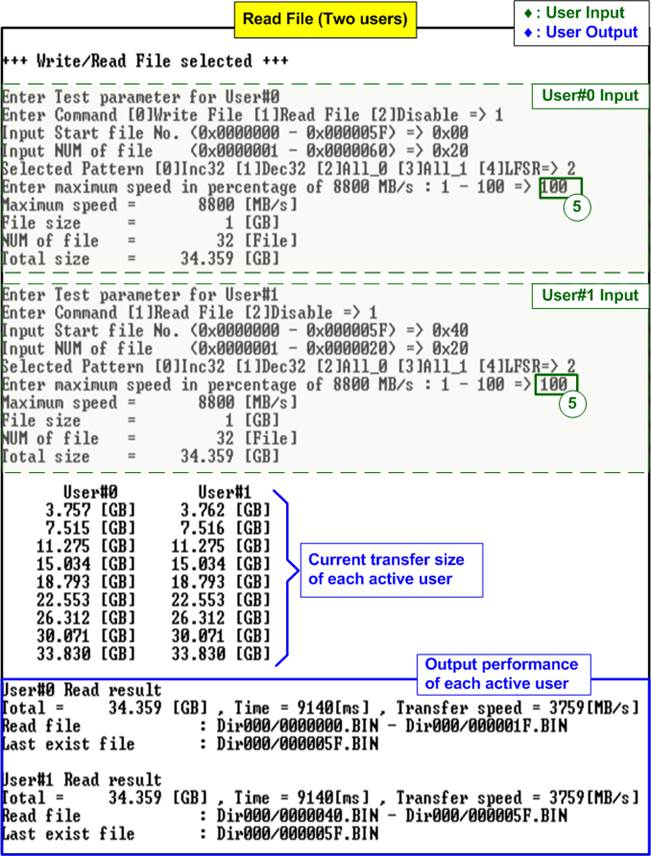
Figure 2‑12 Read file command by two-user
Figure 2‑13 provides an example where User#1ĺs maximum speed is limited. While User#0 is configured at 100% to assess the highest read performance, User#1ĺs maximum speed is restricted to 5% or 440 MB/s.
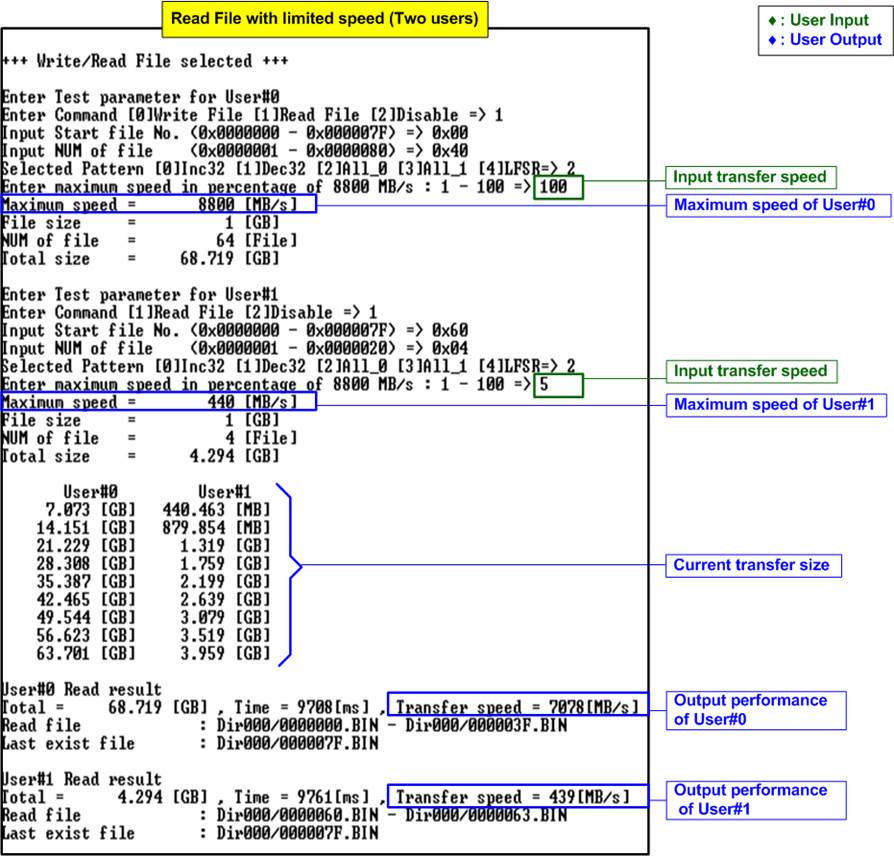
Figure 2‑13 Read command by two-user with limited maximum speed
The results displayed in Figure 2‑13 shows User#0ĺs superior performance relative to User#1. Given the SSDĺs previously established maximum Read performance of approximately 7500 MB/s, User#0ĺs performance should achieve at 7500 ľ 440 = 7060 MB/s, which closely matches the actual results.
Considering User#0ĺs expected read performance (7060 MB/s) is about sixteen times the User#1ĺs speed (440 MB/s), the total transfer size for User#0 is set to be sixteen times that of the User#1. This configuration ensures that the read operation of both users conclude simultaneously, allowing for consistent speed for each user throughout the operation.
If the Read file command encounters a data verification failure, the console will display an error message, as depicted in Figure 2‑14. The error message ôUser#<i> verify failö (where Ĺiĺ is a user index) will be shown, along with the name of the first file where the error occurred, the specific address within the first error file, the expected data, and the data that was actually read.
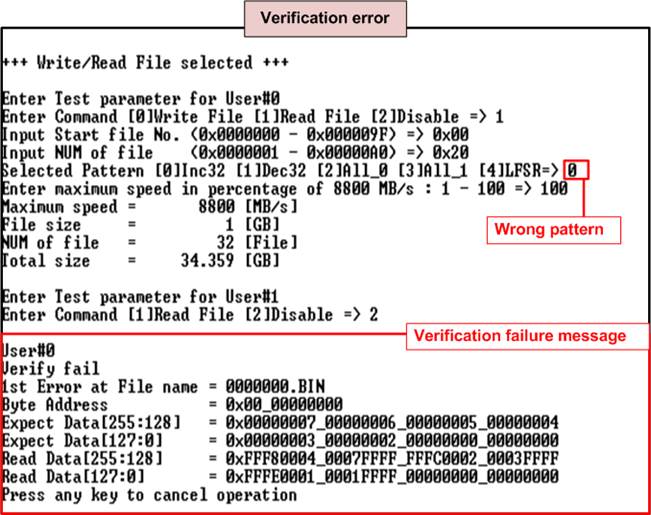
Figure 2‑14 Data verification failure
2.2.3 Mixed Write/Read File Command
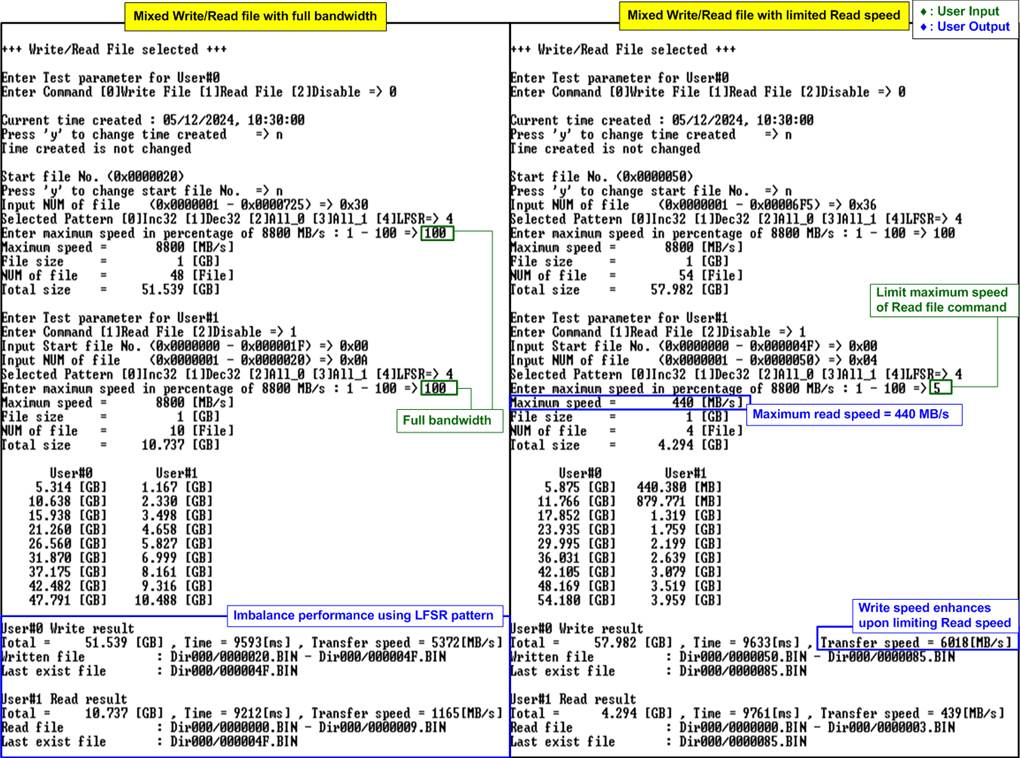
Figure 2‑15 Mixed Write file and Read file commands
Figure 2‑15 presents an example where the Write file command is executed for User#0 concurrently with the Read file command for User#1. Each userĺs input parameters are set independently.
In the left window, the results are displayed when both the Write file and Read file command are executed at maximum speed using the LFSR pattern. This demonstrates a performance disparity where the Write file command is roughly five times faster than the Read File command.
Conversely, the right window depicts a scenario where the Write file command operates at full capacity, but the Read file command is restricted to 5% or 440 MB/s. The limitation enhances the Write file speed. This demo allows users to fine-tune the balance between Write and Read file commands to align with specific system requirements.
2.3 Read File Info Command
Select option Ĺ3ĺ to initiate the Read file info command. This command is accessible to both User#0 and User#1. In multi-user reference designs, information of two files can be retrieved simultaneously using User#0 and User#1. Figure 2‑16 demonstrates executing this command in both single-user and two-user modes.
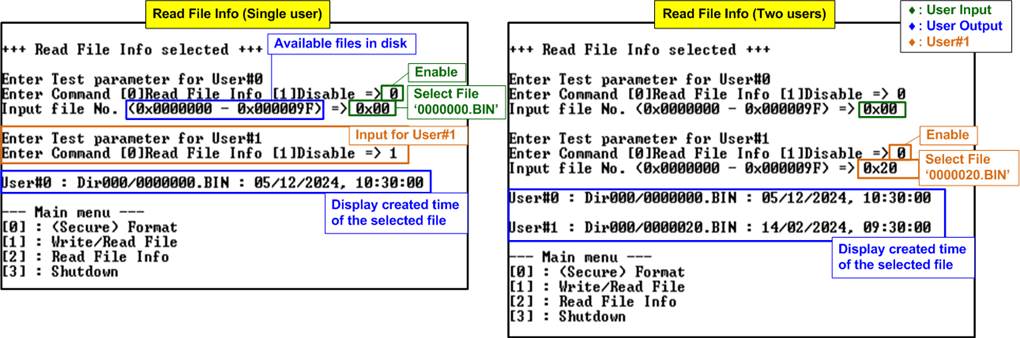
Figure 2‑16 Read File Info command by single and multiple users
To operate the Read file info command, the user needs to provide the following two inputs.
1) Command: Choose between Read file info or Disable.
2) File number: Set the file number to obtain its information. Input can be a decimal value or prefixed with ô0xö for hexadecimal, ranging from 0 to (total number of files on the disk ľ 1).
Once the inputs are verified, the command executes. Upon completion, the console displays the created/modified date and time for the specified file. In two-user mode, the results for User#0 and User#1 are shown separately.
If the input is invalid, an ôInvalid inputö message will appear on the console, the operation will be cancelled, and the system will revert to the main menu.
2.4 Shutdown Command
Select option Ĺ3ĺ through User#0 to initiate the Shutdown command. This command forces the exFAT2-IP and the connected SSD inactive.
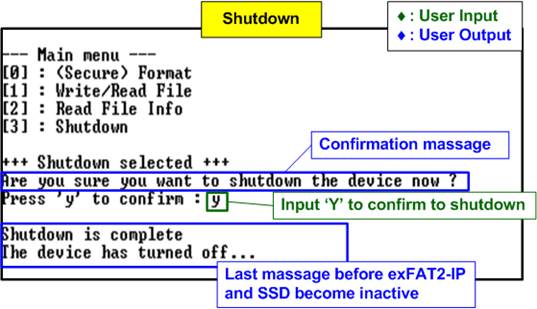
Figure 2‑17 Shutdown command with confirmation
3 Abort Feature (Customized)
This feature allows for the interruption of Write file or Read file commands using the exFAT2-IP with a customized muNVMe-IP, offering a way to cancel operations before they are completed. User can trigger abort functions for User#0 and User#1 independently.
3.1 Abort for Write file command
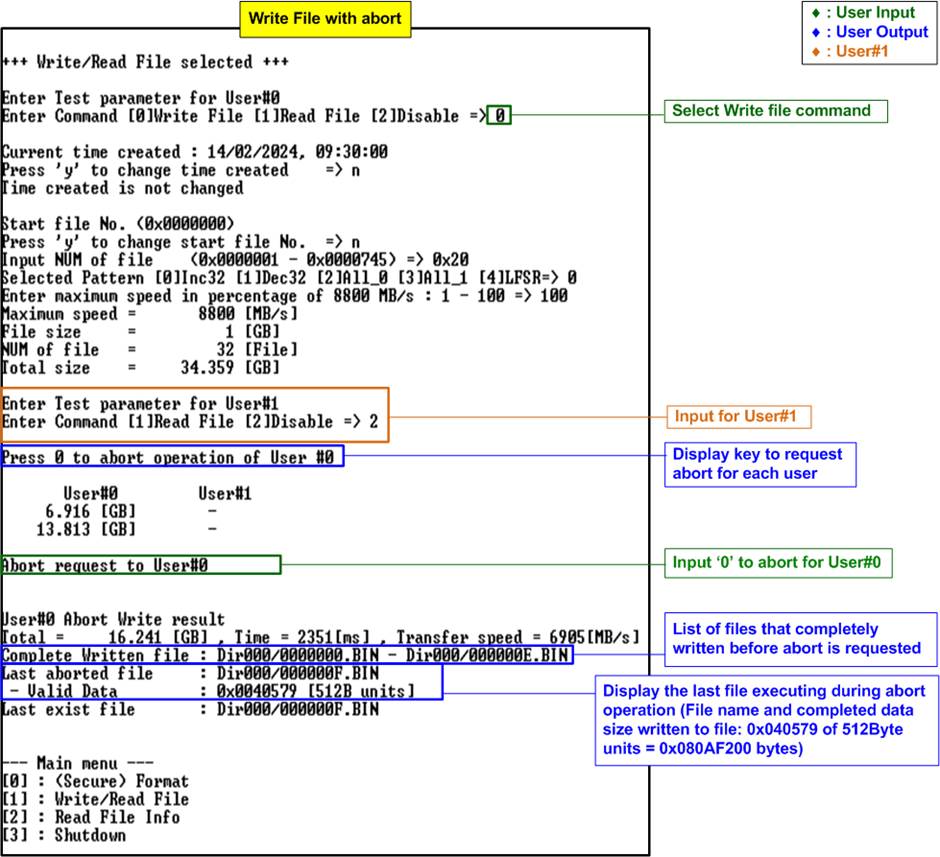
Figure 3‑1 Write File command with abort
In the reference design equipped with an abort function, the console displays a message ôPress 0 to abort operation of User#0ö, before the Write file command begins. By pressing Ĺ0ĺ, the user can abort the Write file command mid-operation. The console will then display ôAbort request to User#0ö, indicating the interruption of the operation. Following a successful abort, the console presents the Write file command results, including the total size, total time usage, and test speed of the user.
Since the abort command can be initiated while a file is being partially written, the console will display the name of the last attempted file, which may not be fully complete, along with the exact amount of data written in 512-byte units. For instance, if data size is 0x40575 units, the actual data size in bytes is 0x80AF200.
Figure 3‑2 illustrates this with the last file, Ĺ000000F.BINĺ, which contains 0x080AF200 bytes of valid data, showcasing the state post-abort.
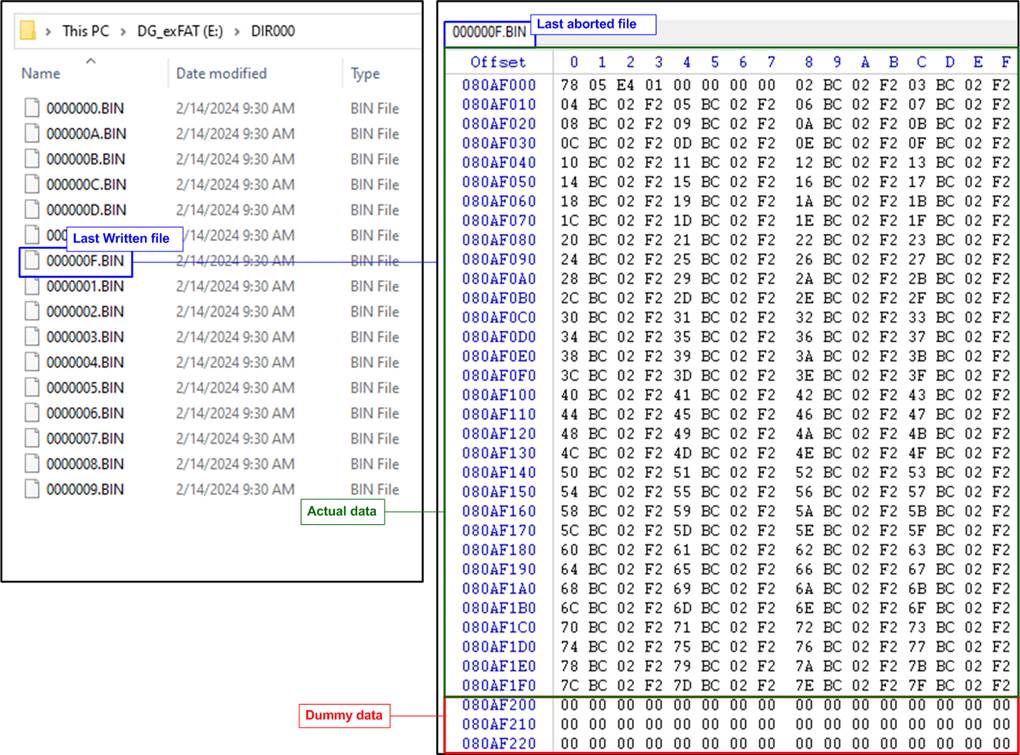
Figure 3‑2 Last written file when Write file command gets aborted
3.2 Abort for Read file command
The Read file command supports dual-user operation, allowing User#0 and User#1 to abort their respective command before completion. For User#0, press Ĺ0ĺ; for User#1, press Ĺ1ĺ. Figure 3‑3 illustrates how to cancel the Read file command for User#0 during both single-user and multi-user executions.
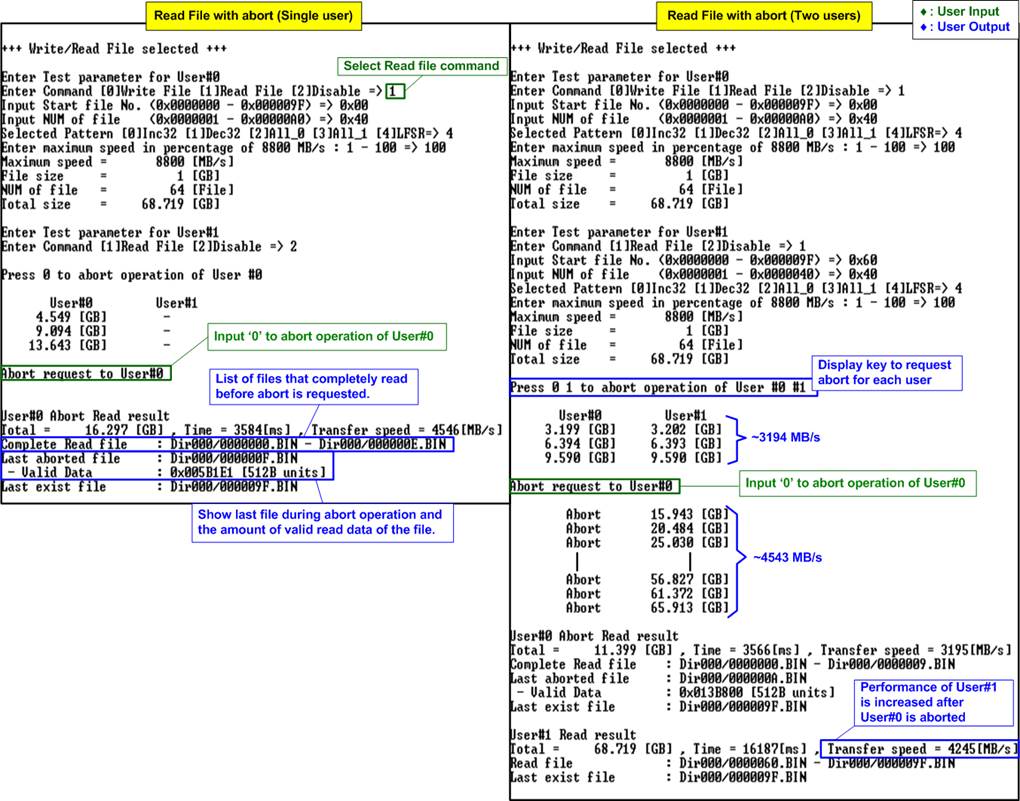
Figure 3‑3 Read File command with abort for single-user and two-user
Upon pressing key <i> to trigger an abort for User#<i> (where Ĺiĺ is the user index), the console will display ôAbort request to User#<i>ö, terminating the operation. Following a successful abort, the console provides a summary of the test, detailing the total size, total time usage, and test speed of each user.
Like the Write file command, aborting a Read file command will result in the console showing a list of successfully read files up to the point of abortion. It will also display the last file attempted before the abort, including the amount of valid data read in 512-byte units. In a two-user scenario, aborting one userĺs command may improve the read performance of the other user. For instance, as depicted on the right side of Figure 3‑3, User#1ĺs speed can increase from 3194 MB/s to 4543 MB/s once User#0ĺs operation is aborted.
4 Revision History
|
Revision |
Date |
Description |
|
1.00 |
7-May-24 |
Initial version release |