FAT32-IP for NVMe Demo Instruction
Rev1.2 7-Jul-23
1 Introduction
This guide provides instructions for running the FAT32-IP for NVMe demo on an FPGA development board to access an NVMe SSD with FAT32 file system functionality. The demo supports for Format, Write file, Read file, and Shutdown commands, allowing users to control test operations through the FPGA console.
To get started, please follow the instructions outlined in the “dg_nvmeip_fpgasetup” document to set up the FPGA board and the test system. The document is available at the following link.
https://dgway.com/products/IP/NVMe-IP/dg_nvmeip_fpgasetup_xilinx_en/
Once the setup process is completed, the SSD initialization is triggered. The default configuration is displayed, giving the option for the user to proceed with the default configuration or change it.

Figure 1‑1 The initialization using the modified file configuration
Figure 1‑1 illustrates an example of the test system booting up with the selection to update the file configuration to a new value. If the file size is modified or if the test SSD is a new device that has never been formatted by FAT32-IP, the next step is to enable the Format operation by entering ‘y’ to confirm the operation. Alternatively, the user can execute the Format operation by selecting option ‘0’ from the main menu.
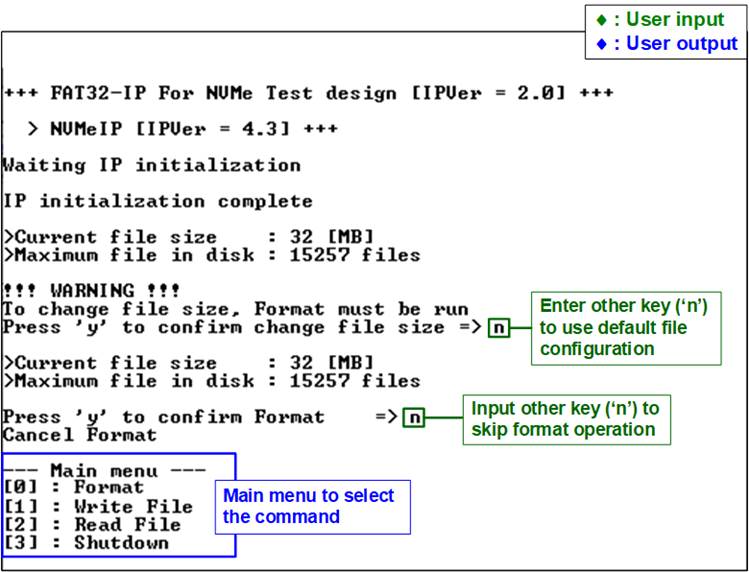
Figure 1‑2 The initialization using the default file configuration without Format operation
Figure 1‑2 illustrates an example of test system booting up with the default file configuration. In this scenario, it is assumed that the test SSD is a device that has been previously formatted by FAT32-IP using the same file configuration (File size = 32 MB). Consequently, there is no need for the Format command and the user enters any key other than ‘y’ for both inputs.
2 Test Menu
2.1 Format
Select ‘0’ from the main menu to initiate the Format command of FAT32-IP. The Format command is required under the following conditions.
1) The device has never been previously formatted by FAT32-IP.
2) The user needs to delete all files stored on the SSD.
3) The user needs to modify the file size on the SSD.
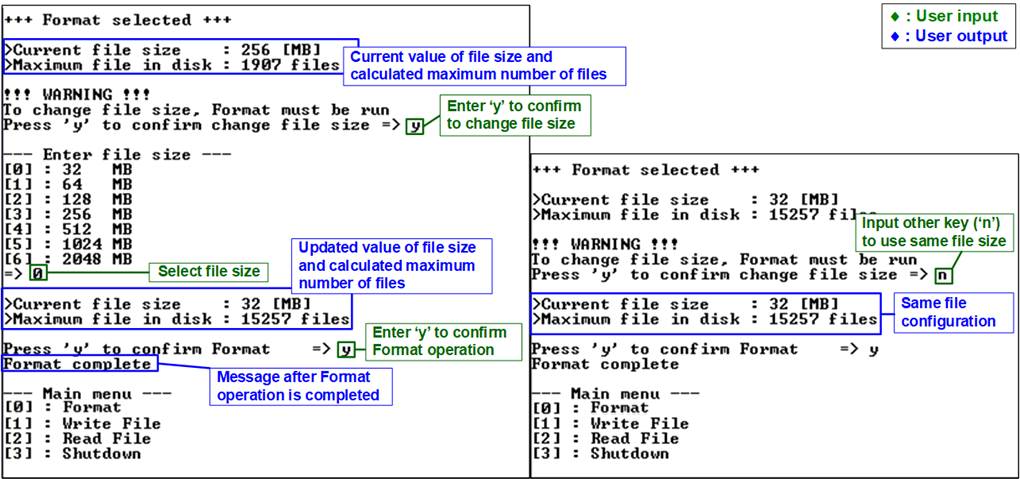
Figure 2‑1 Format menu operation
Upon selecting this menu option, the current file configuration, including file size and maximum number of files, will be displayed on the console. The user can enter ‘y’ to modify the file size, while entering any other key to keep the same file configuration.
If the user proceeds with changing the file size, all seven file sizes, ranging from 32 MB to 2048 MB, can be selected. Once a valid value is entered, the updated file configuration will be displayed to confirm the chosen size.
Next, a menu confirming the Format operation will appear. To execute the Format command, the user enters ‘y’. Otherwise, the other key is entered to skip the Format command.
Upon completing all previous steps, the main menu will be displayed on the console.
2.2 Write File
Select ‘1’ from the main menu to initiate the Write file command of FAT32-IP. The console will then display the default value of the created time of the file. The user can enter ‘y’ to change the time or any other key to use the default time.
Note: The default created time after system boot-up is 24 Sep 2018, 17:35:00.

Figure 2‑2 Result from Write File menu with modified created time
Figure 2‑2 provides an example of executing the Write File menu with a new created time of file. All written files in this command will have the same created time as set in this step. The following six values are required for setting the created time.
a) Date: Enter the created date as a decimal unit. The valid range is 1 – 31.
b) Month: Enter the created month as a decimal unit. The valid range is 1 – 12.
c) Year: Enter the created year as a decimal unit. The valid range is 1980 – 2107.
d) Hour: Enter the created hour as a decimal unit. The valid range is 0 – 23.
e) Minute: Enter the created minute as a decimal unit. The valid range is 0 – 59.
f) Second: Enter the created x2 seconds as a decimal unit. The valid range is 0 – 29. The created second is equal to the input value multiplied by 2.
If an input value is invalid, the corresponding parameter value will not change. Parameter is updated when the input is set in valid range. After receiving all the values, the console displays the new created time.
Next, the menu to receive user parameters for Write file commands are displayed. Three parameters are required, as described below.
1) Start file No: Input the number of the first file name. The input is a decimal unit when the user enters only a digit number. The user can add “0x” to be prefix for hexadecimal unit.
2) NUM of file: Input the total number of written files. The input is a decimal unit when the user enters only a digit number. The user can add “0x” to be prefix for hexadecimal unit.
3) Test pattern: Select the test data pattern of the written file. There are five patterns available: 32-bit incremental, 32-bit decremental, all 0, all 1, and 32-bit LFSR counter.
Once all valid inputs are set, the console will display the file size, the number of written files, and the total transfer size. The operation will then start. During the operation, the current amount of write data is displayed on the console every second to indicate that the system is functioning. Finally, total size, total time usage, and transfer performance are displayed on the console upon completion of the operation. As a result of this operation, the SSD will contain the new written files. The first file name will be FILE<Value of Start file No>.BIN and the last file name is FILE<Value of Start file No + NUM of file>.BIN.

Figure 2‑3 Result from Write File menu with default created time
Figure 2‑3 provides an example of executing the Write File menu using the default created time of file. In this scenario, to continue the previous Write file command, the “Start file No.” is configured to be the next value from the previous command, which creates FILE0000.BIN – FILE03FF.BIN. Therefore, the “Start file No” is set to 0x400 (0x3FF + 1). The new written files after completing the new command will be FILE0400.BIN - FILE09FF.BIN, all with the same created time (14-Feb-2018, 14:14:28).

Figure 2‑4 Example test files written by Write File command
Figure 2‑4 illustrates an example result when the test SSD is connected to other host systems running the Windows 10 OS. The drive name is “DG_FAT32”, and FILE0000.BIN – FILE09FF.BIN are stored in the drive. The created time of all files is 14-Feb-2018, 2.14 PM.
Note: When connecting the SSD to other host system, please be caution and ensure that the device is not written or modified. Only read operation is allowed. If any modifications are done by other host systems, the SSD must be reformatted by FAT32-IP when reconnected to the FAT32-IP system.
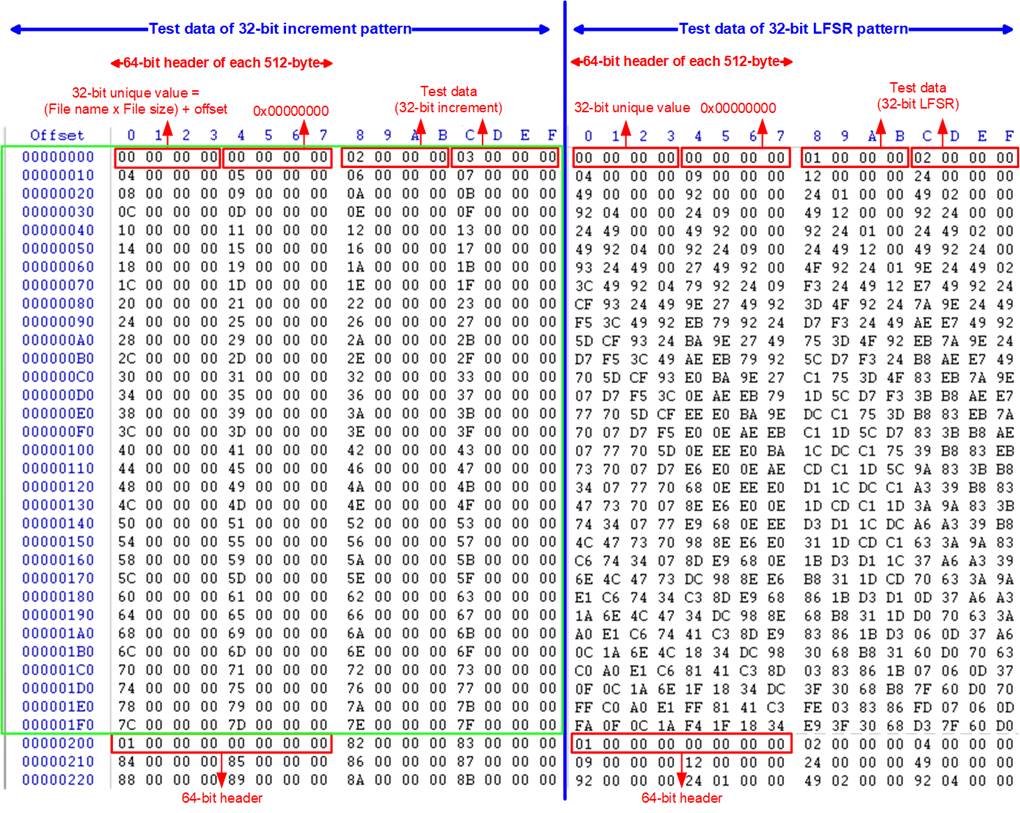
Figure 2‑5 Example Test data of the 1st and 2nd 512-byte data of FILE0000.BIN
using incremental and LFSR pattern
Test data in FILE0000.BIN is divided into 512-byte units. For incremental, decremental, and LFSR patterns, each 512-byte data contains a unique 64-bit header. This header consists of a 32-bit unique value (determined by file name x file size + the 512-byte offset within the file) and a 32-bit zero value. The data following the 64-bit header is the test pattern selected by the user.
The left window of Figure 2‑5 provides an example of the 32-bit incremental pattern, while the right window displays an example of the 32-bit LFSR pattern. When running all-0 or all-1 patterns, the unique header is not included in the data.
Figure 2‑6 –Figure 2‑8 show an example of the inputs that are out of the recommended range for each parameter. The console displays “Invalid input” and then the operation is cancelled.
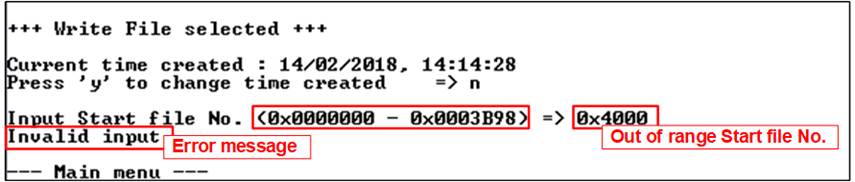
Figure 2‑6 Invalid Start file no. input
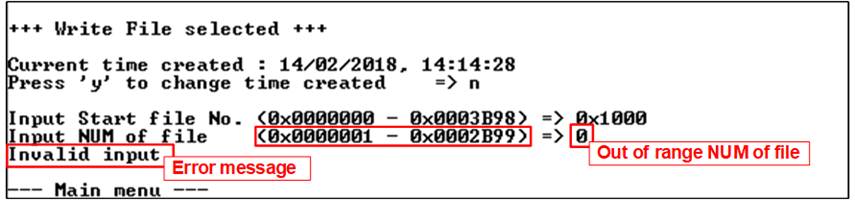
Figure 2‑7 Invalid Num of file input
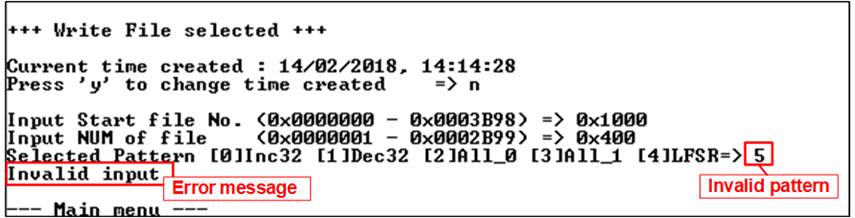
Figure 2‑8 Invalid Test pattern input
2.3 Read File
Select ‘2’ from the main menu to initiate the Read file command of FAT32-IP.
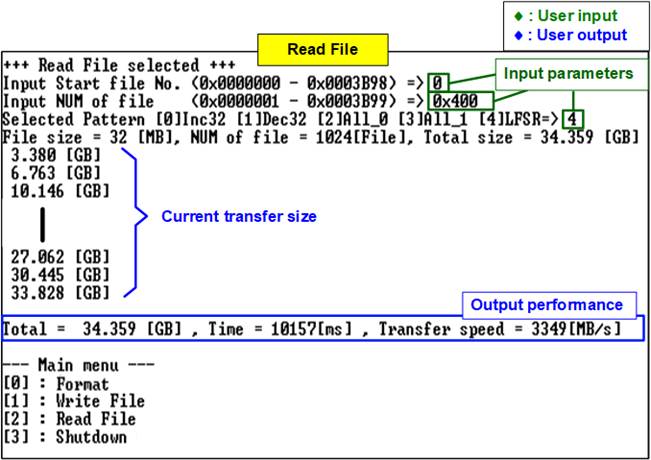
Figure 2‑9 Result and input from Read File menu with successful verification
Similar to the Write File menu, the Read file menu also requires three parameters, as described below.
1) Start file No: Input the number of the first file name. The input is a decimal unit when the user enters only a digit number. The user can add “0x” to be prefix for hexadecimal unit.
2) NUM of file: Input the total number of read files. The input is a decimal unit when the user enters only a digit number. The user can add “0x” to be prefix for hexadecimal unit.
3) Test pattern: Select the test data pattern to verify data of the read file. There are five patterns available: 32-bit incremental, 32-bit decremental, all 0, all 1, and 32-bit LFSR counter.
When all inputs are valid, the operation starts. During the operation, the current amount of read data is displayed on the console every second to indicate that the system is functioning. In the event of invalid input, “Invalid input” will be displayed instead. Once the operation is completed, the console will present the total size, total time usage, and test performance.
Figure 2‑10 and Figure 2‑11 illustrate examples of error message when the data verification fails. The message “Verify fail” is displayed with the information about the first failure data, including the first file name, the error offset position within a file, the expected value, and the read value.
User can simply press any key to cancel read operation. However, if no cancellation command is initiated, the operation will continue until the Read file command is finished. After completion, the console presents the output performance.
If the operation is cancelled, the Read file command will still run as a background process and may not finish in a good sequence. In such cases, it is recommended to power off the FPGA board and the adapter board (if connected), and then power them on to ensure proper functionality.
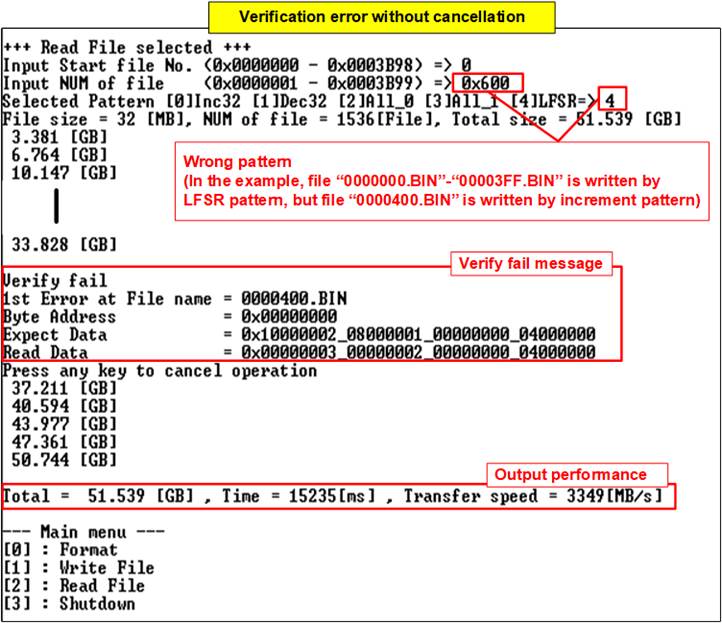
Figure 2‑10 Data verification fails but no cancellation

Figure 2‑11 Data verification failes and press any key to cancel operation
2.4 Shutdown Command
Select ‘4’ from the main menu to initiate the Shutdown command of FAT32-IP.

Figure 2‑12 Shutdown Command with confirmation
A confirmation message will be displayed on the console, and the user will need to enter ‘y’ or ‘Y’ to proceed with the operation. Press any other key to cancel the operation.
Once the Shutdown operation is complete, “Shutdown command is complete” will be displayed as the final message. The console becomes inactive. To begin a new test operation, the user will need to power off and on the test system.
3 Revision History
|
Revision |
Date |
Description |
|
1.2 |
3-Jul-23 |
Remove FPGA setup section and add Shutdown command |
|
1.1 |
25-May-18 |
Update firmware version and description |
|
1.0 |
9-Nov-17 |
Initial version release |