FTP 25G Server Demo Instruction
Rev1.0 3-Jul-23
This document describes the instruction to run FTP 25G Server demo on FPGA development board. NVMe SSD is applied as the storage for transferring files through 25 Gb Ethernet. The demo is designed to run as FTP Server, connecting with TestPC which runs FTP client by using FileZilla version 3.45.1. User sets the test parameters on FPGA and monitors the hardware status through FPGA console.
1 PC Setup
Before running demo, please check the network setting on PC. The example for setting 25Gb Ethernet card is described as follows.
1.1 IP Setting

Figure 1‑1 Setting IP address for PC
1) Open Local Area Connection Properties of 25-Gb connection, as shown in the left window of Figure 1‑1.
2) Select �TCP/IPv4� and then click Properties.
3) Set IP address = 192.168.25.25 and Subnet mask = 255.255.255.0, as shown in the right window of Figure 1‑1.
1.2 Speed and Frame Setting

Figure 1‑2 Set frame size = jumbo frame
1) On Local Area Connection Properties window, click �Configure� as shown in Figure 1‑2.
2) On Advanced Tab, select �Jumbo Packet�. Set Value to �9014 Bytes� for Jumbo Frame support or set value to �Disabled� for non-Jumbo Frame support, as shown in the bottom window of Figure 1‑2.
3) Select �Speed & Duplex�. Set value to �25 Gbps Full Duplex� for running 25-Gigabit transfer test, as shown in Figure 1‑3.

Figure 1‑3 Set link speed = 25 Gbps
4) Select �Interrupt Moderation� and set value to �Disable�.

Figure 1‑4 Interrupt Moderation
5) Click �OK� button to save and exit all setting windows.
1.3 Power Option Setting
1) Open Control Panel and select Power Options as shown in the left window of Figure 1‑5 .
2) Change setting to High Performance as shown in the right window of Figure 1‑5.

Figure 1‑5 Power options
1.4 FileZilla Setting
The reference design supports only one connection for transferring data through 25 Gb Ethernet. Therefore, FileZilla must be configured to transfer data by using one connection as shown in Figure 1‑6.
1) On FileZilla application, select Edit -> Settings.
2) In Transfers page, set �Maximum simultaneous transfer� = 1 (Default value is 2) and click �OK� button to confirm the setting.

Figure 1‑6 FileZilla Setting
2 Main menu

Figure 2‑1 Message after system boot-up
After FPGA programming is finished, the console displays the boot message as shown in Figure 2‑1 .
- �Waiting exFAT-IP initialization� is displayed during running initialization.
- �exFAT-IP initialization complete� is displayed when finishing initialization and IP is idle.
Next, the console waits the input for user selecting the test option. The example steps for running the test are shown as follows.

Figure 2‑2 Format the disk
1) If the disk is not formatted by exFAT-IP, �The disk must be formatted by exFAT-IP� is displayed. In this condition, user must enter �y� to format the disk. Otherwise, the user can enter �y� to confirm format operation for clearing the data in the disk or enter other keys to skip format process and start running at step 5).
2) When running Format disk, the message for setting created time and date are asked. The created time and date are the input for Format command to create the empty directory in the SSD. More details about the empty directory are described in exFAT-IP documents.
3) Under Format operation, user must set file size for using in the SSD. This file size must be matched to the file size in Test PC for loading the file to the SSD by FTP client application.
4) After finishing file size setting, Format operation is operated. �Format Disk complete� and file system information are displayed after finishing Format operation.

Figure 2‑3 Change time created
5) �Current time created� is displayed to show default time. User enters �y� to change time created or other keys (not �y�) to use the default value. The time created is applied to be the input when running FTP server operation. To set time created, there are six parameters for setting created date and time.
· Year �Year of created date. Valid range is 1980 � 2107.
· Month � Month of created date. Valid range is 1 � 12.
· Date � Date of created date. Valid range is 1 � 31.
· Hour � Hour of created time. Valid range is 0 � 23.
· Minute � Minute of created time. Valid range is 0 � 59.
· Second � x2 second of created time. Valid range is 0 � 29.
All inputs are received as decimal unit. User can add �0x� as a prefix for hexadecimal input. When the input is invalid, the parameter is not updated and the same value is used. After setting the new created date and time, �Date and Time changed� with the updated value are displayed on the console.
Note: Time created value is applied for two functions.
First, the new file which is uploaded from Test PC to the SSD by using FTP client software uses the created time/date as created time/date of the file in the SSD.
Second, when user reads the file list in the SSD via FTP client software, the created time/date of all files in the device is equal to this value. As a result, the modified time/date displayed on FTP client software may be different from the created date/time of the file in the device, as shown in Figure 2‑4.

Figure 2‑4 Time created of the SSD comparing between on the window and FTP client

Figure 2‑5 Set TOE25G-IP parameter before running demo
6) The menu to set network parameters are displayed. Enter �x� to skip parameter setting by using default parameters for system initialization or other keys to change parameters. Six parameters can be changed by the user. The details for changing parameters are as follows.
Note: User can set the invalid value such as �n� to the parameter for using the same value. After finishing parameter setting, TOE25G-IP is reset and begins initialization process.
· Window Update Gap: Set threshold value to transmit window update packet. Valid value is 0x00 � 0x3F (0-63). The unit size of threshold value is 1 Kbyte. Default value is 0 (disable window update feature).
· FPGA MAC address: Input 12-digit of hex value. Add �0x� as a prefix for hexadecimal input.
· FPGA IP address: A set of four decimal digits is separated by �.�. The valid range of each decimal digit is 0-255.
· FPGA port number: Valid range is 0-65535, except 21 which is control port number.
· Target IP address: A set of four decimals like FPGA IP address. This value is IP address of Test PC.
· Target port number: Valid range is 0-65535, except 21 which is control port number.
7) After finishing system initialization, main menu is displayed with four operations which are described in more details as follows.
Menu [0]: Run the FTP server
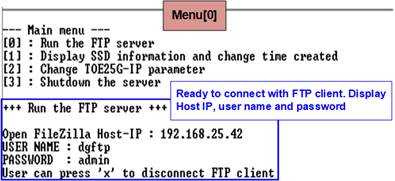
Figure 2‑6 Run the FTP server
· Select �0� to run the FTP server. After that, three parameters for setting in FTP client application, i.e. Host IP, User name and password are displayed. Now the user can open FTP client application on Test PC to connect with FTP server hardware.

Figure 2‑7 Disconnect the FTP client
· When there is no operation on FTP client application, the user can press �x� to disconnect the FTP client and return to main menu, as shown in Figure 2‑7. After that, user can change network parameters for the new connection or shutdown the system.
Menu [1]: Display SSD information and change time created

Figure 2‑8 Display the disk information and change time created
· Select �1� to display the SSD information and change file created time. System information in SSD is displayed.
· Enter �y� to change time created in the test system or other keys to use the same value.
Menu [2]: Change TOE25G-IP parameter

Figure 2‑9 Change the TOE25G-IP parameter
· Select �2� to change the TOE25G-IP parameters. This menu is applied when user needs to change the FTP client to other PCs. The user must set the new value of the network parameters for the new PC and then re-connect the connection between FTP server and FTP client.
Menu [3]: Shutdown the server

Figure 2‑10 Shutdown operation
· Select �3� to shut down the server.
· Confirmation message is displayed on the console. User enters �y� to confirm the operation or other keys to cancel the operation.
· After finishing shut down the server, �Shutdown command is complete� is displayed on the console. It is the last message on the console and the system takes no response to any inputs from user. User needs to power off/on test system to restart the test operation.
3 FTP Client
This topic describes the details when running FTP server with FTP client software on PC.
3.1 Login FTP Server
To login FTP Server by FileZilla, the step is as follows.
1. Input server parameters following parameter recommended on the console.
a. Host IP : FPGA IP, set during initialization. Default value is 192.168.25.42.
b. Username : dgftp
c. Password : admin
2. Click �Quickconnect� button.

Figure 3‑1 Login FTP server
After finishing setting server parameters, the console shows logged in successful. Directory name shows file size set in the storage. For example, directory name is F008GB for 8-GB file size. If FTP storage is not empty, file lists in the storage are displayed. The modified date and time of the file is equal to time created, set before running FTP server menu.
Note: FTP client reads time zone from FTP server as UTC+0 time zone, but the time displayed on FTP client is adjusted to be user�s time zone. For example, when created time before running FTP server menu is 2:02 PM, modified time on FTP client is 9:02 PM in UTC+7 time zone.
3.2 Upload file
To upload file to FTP Server from Test PC by using FileZilla, user must prepare the uploaded file on Test PC. The status during uploading can be monitored on FileZilla for FTP client side and FPGA console for FTP server side. The step for uploading file is as follows.

Figure 3‑2 Upload file
1. Select the uploaded file in Test PC. The limitation of the uploaded file is as follows.
a. File name is XXXXXXX.BIN (X is hex value). The value of uploaded file name must be equal or less than the next value of the latest file in FTP server storage. In Figure 3‑2, the latest file is 0000001.BIN, so the uploaded file must be 0000002.BIN or less.
b. File size of the uploaded file name must be equal to FTP server directory name. In the example, F008GB supports only 8 GiB (1024x1024x1024 byte) file.
Note: (1) File size can be changed by format operation only.
(2) For the new disk, the 1st file name must be 0000000.BIN.
2. Right-click on the selected file and select �Upload�, as shown in Figure 3‑2.
Note: User can select multiple files on Test PC to upload to FTP server, but only one file is transferred at a time.

Figure 3‑3 Status message during uploading file
3. During uploading process, user can monitor the progress on FileZilla or FPGA console.
a. Current transfer size of each file is displayed on the console every second.
b. After finishing uploading file, transfer speed is displayed on the console.
Note:
(1) Transfer speed is limited by TestPC resource for handling the task, FTP client storage performance and data allocation of the file in the FTP client storage. As shown in Figure 3‑3, the performance is not peak value because CPU on PC is sometimes switched to handle other tasks.
(2) The best performance is achieved when the test file on FTP client storage is created by exFAT-IP. More details of exFAT-IP demo are described in following document.
https://dgway.com/products/IP/NVMe-IP/dg_exfatip_nvme_instruction_en.pdf
c. On FileZilla, total time and successful message are displayed as test status.
d. The new uploaded file is available on FTP server storage. In the example, 0000002.BIN is available in the storage.

Figure 3‑4 Uploaded File in the SSD
e. Figure 3‑4 shows the example when FTP server SSD moves from FPGA to connect with the PC directly. Modified date of the new file (0000002.BIN) is the same as the value set during disk initialization when running the test on FPGA, as shown in Figure 2‑3.
3.3 Download file
To download file from FTP Server to Test PC, user selects the downloaded file on FTP server through FileZilla for storing the file to the destination folder on Test PC. The step for downloading file is as follows.

Figure 3‑5 Download file
1. Select the downloaded file from FTP Server storage.
2. Right-click on the selected file and select �Download�, as shown in Figure 3‑5.
Note: User can select multiple files for downloading from FTP server, but only one file is transferred at a time.

Figure 3‑6 Status message during downloading File
3. During downloading file, user can monitor the progress on FileZilla or FPGA console like uploading process.
a. Current transfer size of each file is displayed on the console every second.
b. After finishing downloading file, transfer speed is displayed on the console.
Note: Transfer speed is limited by TestPC resource for handling the task and FTP client storage performance.
c. On FileZilla, total time and successful message are displayed as status.
d. The new downloaded file is available on Test PC. For example, 0000002.BIN is the new file downloaded from FTP server.
4 Revision History
|
Revision |
Date |
Description |
|
1.0 |
15-Oct-20 |
Initial version release |