FPGA Set up for NVMeTCP-IP Cloud Accelerator Demo
1 Introduction
This document provides a comprehensive guide for setting up an accelerator card to demonstrate a Storage Accelerator system for cloud solutions using the NVMe/TCP protocol over a 100G Ethernet connection. It includes step-by-step instructions for installing the FPGA Accelerator card into the host system and configuring it to connect to a storage system via a 100G Ethernet link.
Before initiating the test, ensure the following hardware components are prepared:
1) Accelerator card: Silicom N6010 card
2) Host system required for connecting the Accelerator card. The demo results are based on the following host system specifications:
· Operating System: Oracle Linux 8.8 with a Kernel 4.18
· Motherboard: Gigabyte Z590 AORUN Master (rev 1.0)
· CPU: Intel i7-11700K (3.6 GHz)
· RAM: 64 GB DDR4
3) NVMe/TCP Target system serves as the system storage. The demo results are based on the following NVMe/TCP Target system specifications:
· Operating System: Ubuntu 22.04 LTS
· Motherboard: ASUS Z690M-PLUS D4
· CPU: Intel i5-12600K (3.6 GHz)
· RAM: 64 GB DDR4
· NVMe SSD: Intel Optane SSD DC P5800X
4) 100G Ethernet Cable: 2xQSFP28 transceivers and MPO to MPO cable. An example cable set is as follows:
· 2xQSFP28 transceiver (100GBASE-SR): AMQ28-SR4-M1
https://www.sfpcables.com/100G-s-qsfp28-sr4-optical-transceiver-module-1499
· MPO to MPO cable: OM4-MPO-8MPO-1M
https://www.sfpcables.com/mpo-to-mpo-multimode-om4-50-125-m-8-core-4381
5) Programming cable set:
· Intel FPGA Download Cable II: https://www.intel.com/content/www/us/en/products/sku/215664/intel-fpga-download-cable-ii/specifications.html
· 2x5 Extension header – Samtech Part No: ESQ-105-13-L-D
· mini-USB cable
6) Quartus Programmer for programming the Accelerator card, installed on the laptop or PC.
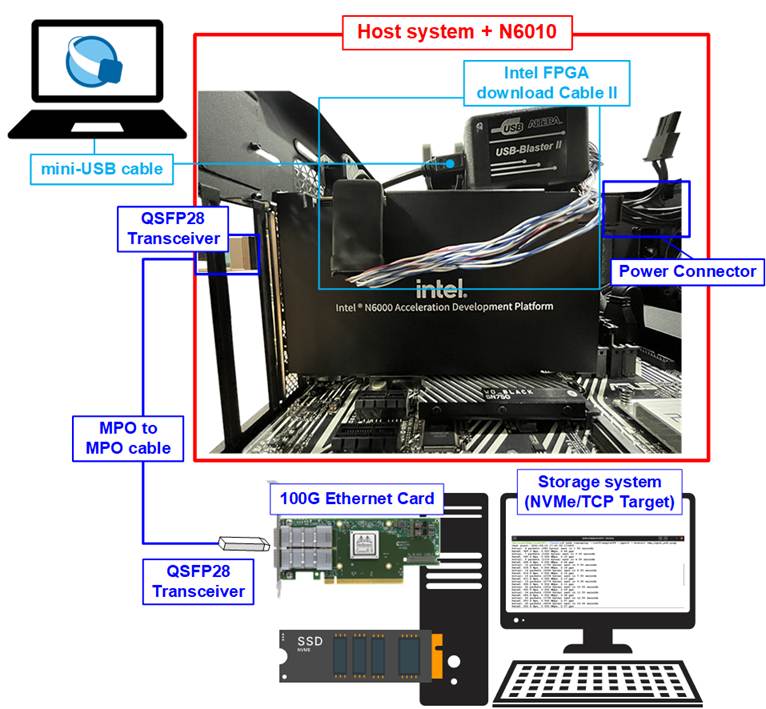
Figure 1 Demo Setup on Silicom N6010 Card
2 Accelerator Setup
This section outlines the steps to prepare the Host system with Accelerator card for running the demo.
1) Setting DIP SW1[1:4] of N6010 card to “OFF OFF OFF ON” and SW2 = “OFF” as shown in Figure 2.
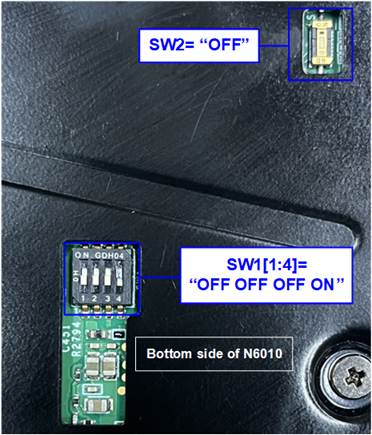
Figure 2 Switch Setting of Silicom N6010 Card
2) Insert the Accelerator card into the PCIe slot of the Host system.
3) Connect the Intel FPGA Download Cable II to the N6010 Card.
i) Insert 2x5 Extension header to J10.
ii) Connect Intel FPGA Download Cable II to 2x5 Extension header as shown in Figure 3.
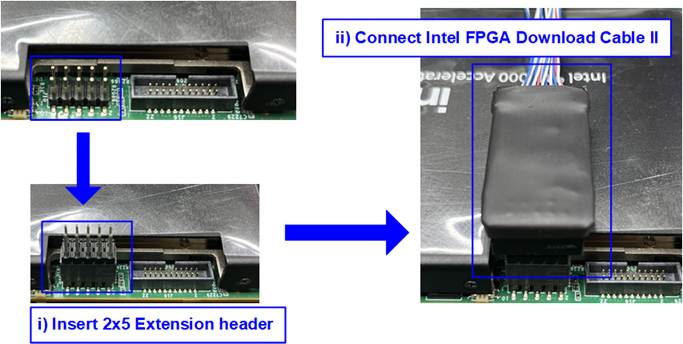
Figure 3 Connect Intel FPGA Download Cable II
4) Connect 100G Ethernet cable between the Accelerator card and the target system.
i) Insert a QSFP28 transceiver and MPO to MPO cable into the QSFP28 connector on the Accelerator card. There are two QSFP28 channels on the N6010 card. Make sure to utilize the QSFP1 channel.
ii) Connect the other end of the MPO cable by inserting the QSFP28 transceiver to the 100G Ethernet card on the Storage system (NVMe/TCP Target).
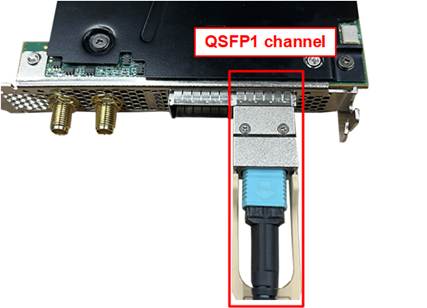
Figure 4 QSFP28 Connection on Silicom N6010 Card
5) Open the Quartus Prime Programmer and program the Accelerator card with the required SOF file as illustrated in Figure 5.
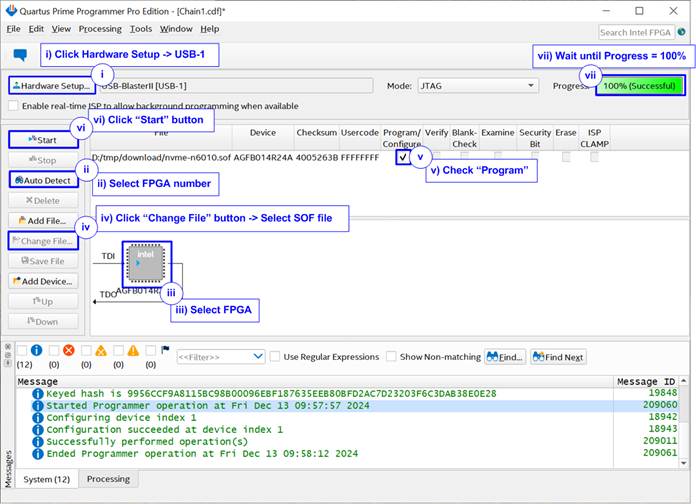
Figure 5 Program Accelerator Card by Quartus Programmer
6) Perform a warm reboot of the system and use the “nfb-info” command to verify that the demo has been successfully configured on the Accelerator card. The demo system information must be displayed, as shown in Figure 6.
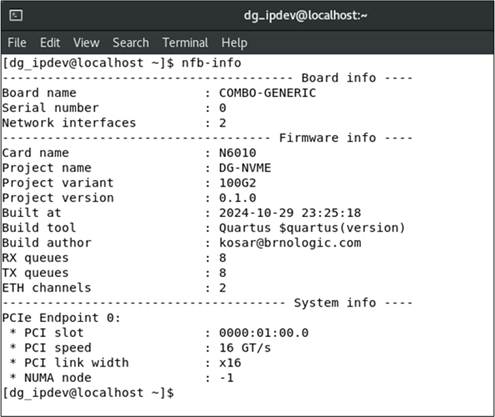
Figure 6 Result of nfb-info Command
3 Revision History
|
Revision |
Date (D-M-Y) |
Description |
|
1.00 |
14-Mar-25 |
Initial version release |