2 FPGA development board setup
4.1 File format for Rule data and Key data
5.1 File format for word rule and word key
All configurations required for this demo can be easily managed through the serial console interface. This instruction provides guidance on how to set up the test environment, execute the demo, and interpret the results.
1 Environment Setup
To operate tCAM-IP demo, please prepare following test environment.
1) FPGA development board (KCU116 development board).
2) Test PC.
3) Micro USB cable for JTAG connection between FPGA board and Test PC.
4) Micro USB cable for UART connection between FPGA board and Test PC.
5) Vivado tool for programming FPGA installed on Test PC.
6) Serial console software such as TeraTerm installed on PC. The setting on the console is Baudrate=115,200, Data=8-bit, Non-parity and Stop=1.
7) Demo configuration file (To download this file, please visit our web site at www.design-gateway.com).
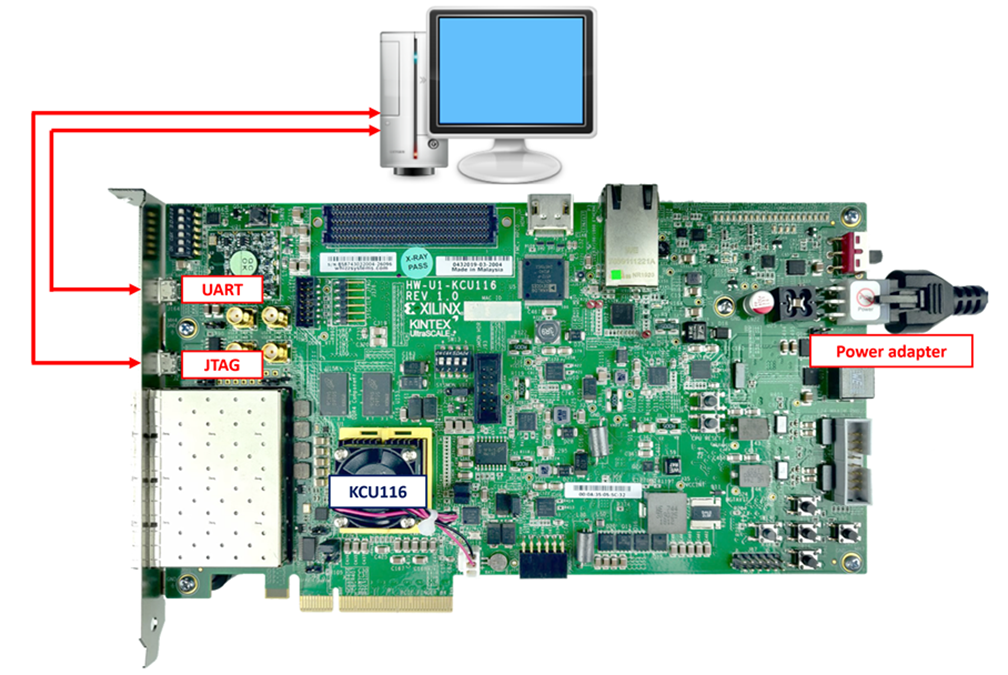
Figure 1 tCAM-IP demo environment on KCU116 board
2 FPGA development board setup
1) Make sure the power switch is off and connect the power supply to KCU116 development board.
2) Connect USB cable between PC to JTAG micro USB port.
3) Power on the system.
4) Open Vivado Hardware Manager to program FPGA by following steps.
i) Click open Hardware Manager.
ii) Open target -> Auto Connect.
iii) Select FPGA device to program bit file.
iv) Click Program device.
v) Click “…” to select program bit file.
vi) Click Program button to start FPGA Programming.
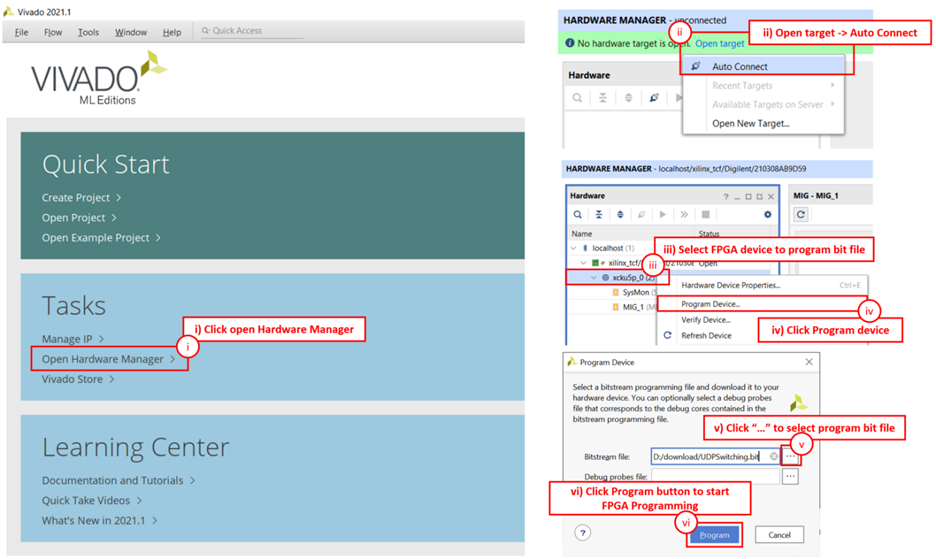
Figure 2 Program Device
3 Serial Console
The serial console allows users to configure parameters and manage the tCAM-IP demo. Through this interface, users can input rule data, perform key searches, and utilize the word replacement feature. The commands menu for the tCAM-IP demo are displayed as shown in Figure 3, with detailed descriptions provided in topic 4 and topic 5.
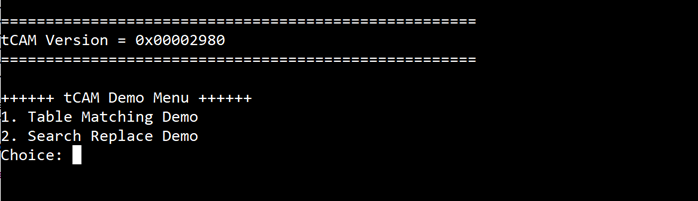
Figure 3 Serial Console
4 Table Matching Demo
This topic outlines the process of demonstrating the table matching functionality of the tCAM-IP. The demo showcases how the tCAM-IP matches input keys against predefined rules stored in its memory. The demonstration includes steps for initializing rules, performing key searches, and displaying the results.

Figure 4 Table Matching Demo menu
4.1 File format for Rule data and Key data
User can prepare Rule data or Key data file for this demo. The file format is shown as Figure 5 and Figure 6 for rule width 32-bit and 64-bit respectively. The valid range of data is 0-256, where ‘256’ is defined as a don't care value. To indicate the end of the data, the last rule must be followed by a blank line.
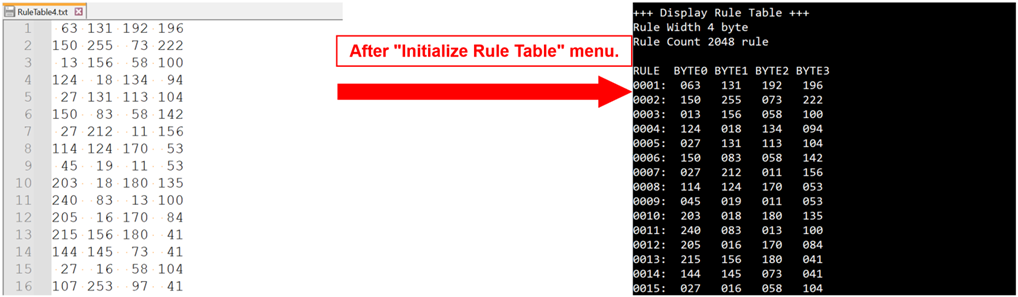
Figure 5 Example of 32-bit rule file
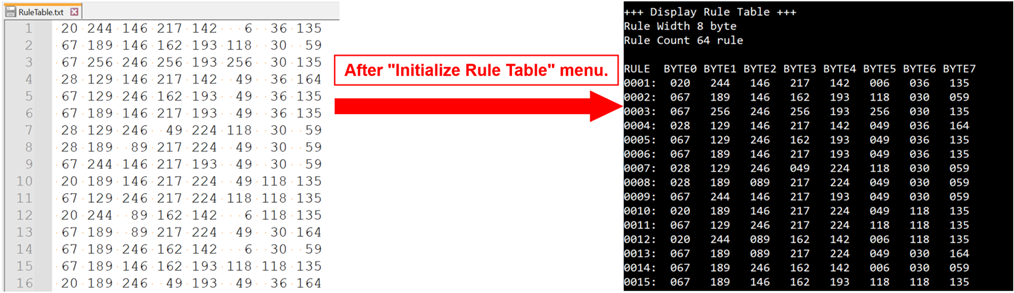
Figure 6 Example of 64-bit rule file
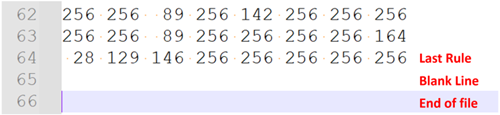
Figure 7 Example of including blank line to indicate the end of data
4.2 Initial Rule Table
This command is used to receive rules from the user and apply them to the initial rules of the tCAM-IP, as shown in Figure 8. Initially, the user must specify the size of the rule, ranging from 1 to 8. The system will then wait to receive data from the user. Once the data has been received complete, the rule size and the number of rules will be displayed. If the tCAM-IP can initialize the rule correctly, it will show the message: "Success: IP initialize completed." Users can send the rule data file via the serial console, as shown in Figure 9. In this demonstration, the maximum rule size is limited to 8 kB.
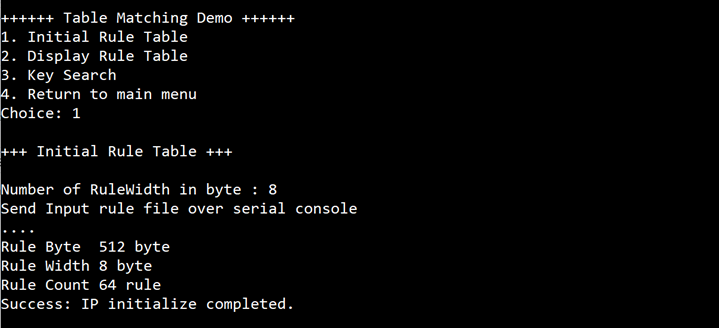
Figure 8 Example of Initial rule file
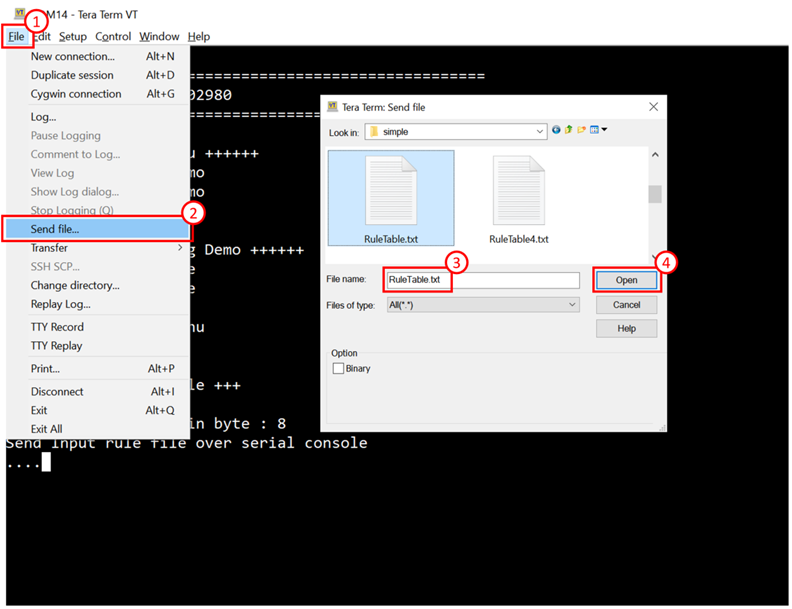
Figure 9 Example of transferring rule file
4.3 Display Rule Table
This command is used to displays the currently configured rules in the tCAM-IP. The displayed information will include details such as the rule index and the rule content. This functionality allows users to verify the correctness of the initialized rules and ensures that the tCAM-IP is set up as intended.
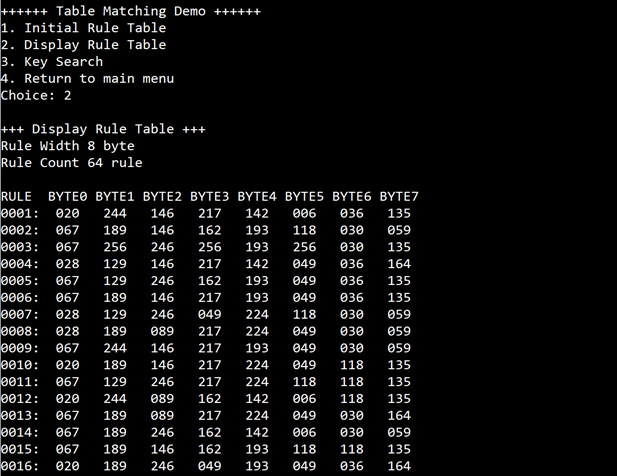
Figure 10 Example console when displaying rule table
4.4 Key Search
This command is used to receive keys from the user and apply them to the tCAM-IP. It displays the incoming keys and the search results as rule numbers. Upon completion of the operation, the command will show the total number of searches conducted and the number of matches found, as show in Figure 11.
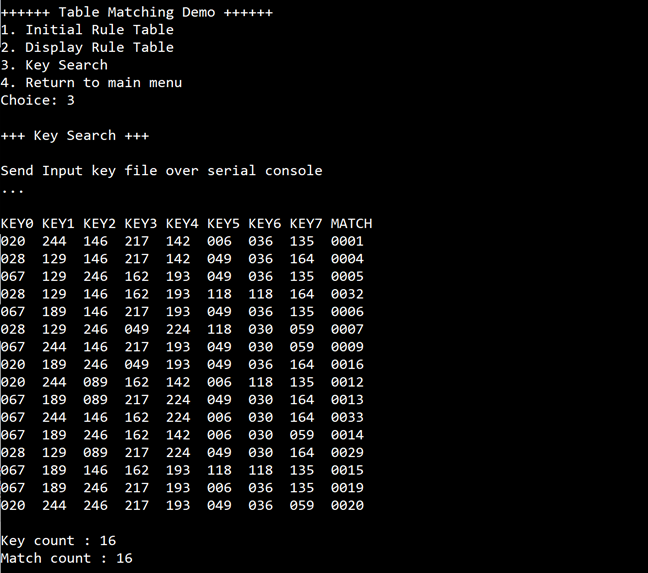
Figure 11 Example of Key Search
5 Search Replace Demo
This topic demonstrates the search and replace functionality using tCAM-IP. The demo allows users to input words, which are then compared against predefined rules with the help of tCAM-IP. If a match is found, the word is replaced according to the rule; otherwise, the original word is displayed.

Figure 12 Search Replace Demo menu
5.1 File format for word rule and word key
Users can prepare rule data in the specified file format shown in Figure 13. The valid range of data includes characters from ‘A-Z’, ‘a-z’, and ‘0-9’. To indicate the end of the data, the last rule must be followed by an empty line as shown in Figure 7.

Figure 13 Example of word rule file
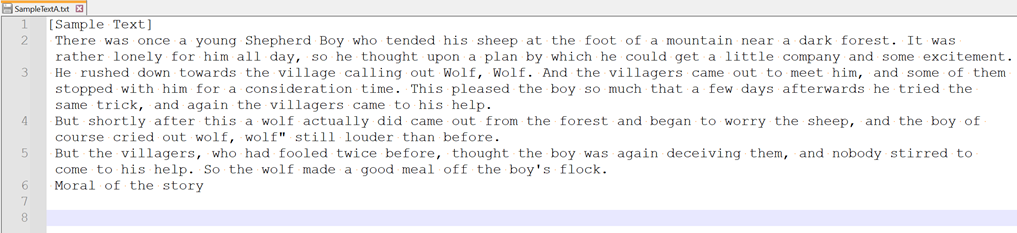
Figure 14 Example of word key file
5.2 Initial Word Rule
This command is used to receive rules from the user and apply them to the initial rules of the tCAM-IP, as shown in Figure 15. Initially, the user must specify the size of the rule, ranging from 1 to 8. The system will then wait to receive data from the user. Once the data has been received complete, the rule size and the number of rules will be displayed. If the tCAM-IP can initialize the rule correctly, it will show the message: "Success: IP initialize completed." Users can send the word rule file via the serial console, as show in Figure 9. In this demonstration, the maximum rule size is limited to 8 kB.
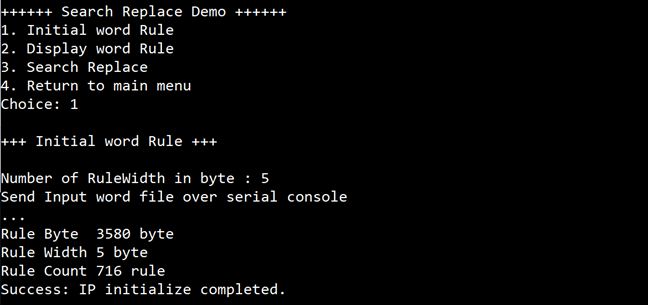
Figure 15 Example of Initial word rule file
5.3 Display Word Rule
This command retrieves and displays the currently configured word rules in the tCAM-IP. The displayed information will include details such as the rule index and the corresponding word content. This functionality allows users to verify the correctness of the initialized word rules and ensures that the tCAM-IP is set up as intended.
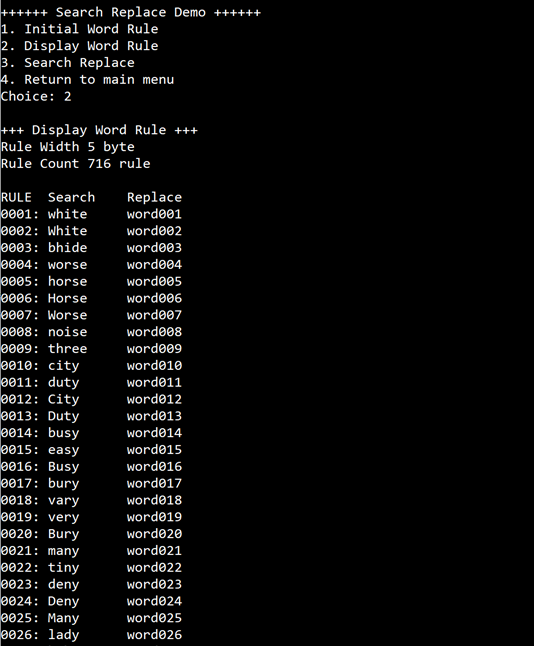
Figure 16 Example console when displaying word rule
5.4 Search Replace
This command is used to receive words from the user and apply them to the tCAM-IP. If the incoming word matches any of the predefined rules, it will be replaced according to the specified rules. Conversely, if the word does not match any rules, the original word will be displayed. Upon completion of the operation, the command will display the total number of searches and the number of words that were replaced, as show in Figure 17.
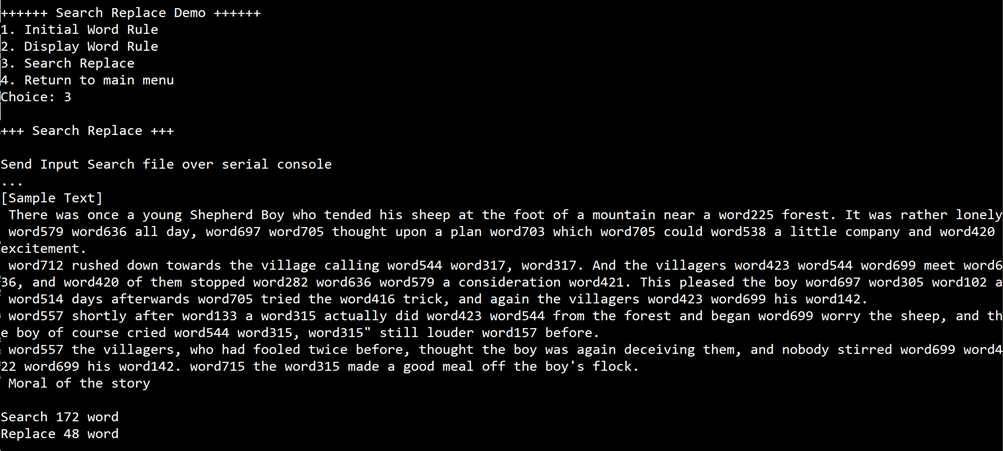
Figure 17 Example of Search Replace
6 Revision History
|
Revision |
Date (D-M-Y) |
Description |
|
14-Oct-24 |
Update table of contents. |
|
|
2.00 |
2-Oct-24 |
Improve reference design to be standalone version. |
|
1.00 |
30-Jun-21 |
Initial version release. |