2 FPGA Development Board Setup
3 Running the Demo via JTAG UART terminal
4.1 Custom ECDSA Parameter Verification
4.2 NIST Test Vector Verification
4.3 PEM Certificate Verification
5 Running the Demo via Graphic user interface
This document provides the instruction for demonstrating the operation of the ECDSA256 Verification IP core (ECDSA256V-IP) on FPGA evaluation board. In this demonstration, the ECDSA256V-IP is used to verify a digital signature signed with the NIST P-256 curves. Users can verify a signature by providing the required input parameters, test compliance using NIST test vectors, and verify SSL certificates as a practical example of real-world usage.
1 Environment Setup
To operate ECDSA256V demo, please prepare following test environment.
1) FPGA development board (Sulfur Agilex 5 E-Series board).
2) Test PC.
3) Micro USB cable for JTAG connection connecting between FPGA board and Test PC.
4) Quartus Programmer and Nios Command Shell, installed on PC.
5) Demo configuration file (To download these files, please visit our website at www.design-gateway.com).
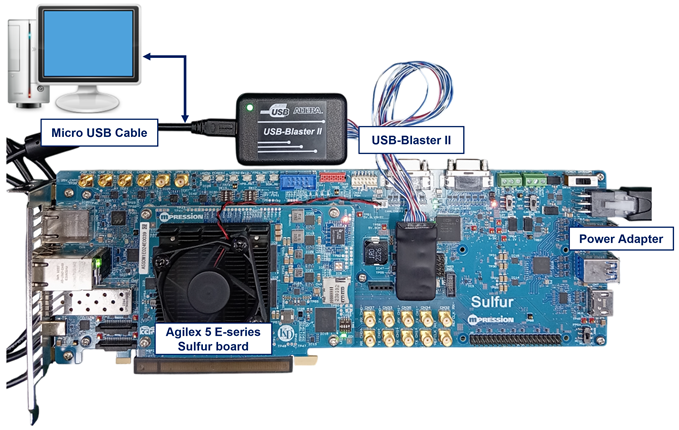
Figure 1 ECDSA256V demo environment on Agilex 5 E-Series Sulfur board
2 FPGA Development Board Setup
1) Make sure power switch is off and connect power supply to FPGA development board.
2) Connect USB cables between FPGA board and PC via micro-USB ports.
3) Turn on power switch for FPGA board.
4) Open Quartus Programmer to program FPGA through USB-1 by following step.
i. Click “Hardware Setup…” to select
− USB-BlasterII [USB-1]
ii. Click “Auto Detect” and select FPGA number.
iii. Select FPGA device icon.
iv. Click “Change File” button, select SOF file in pop-up window and click “open” button.
v. Check “program”.
vi. Click “Start” button to program FPGA.
vii. Wait until Progress status is equal to 100%.
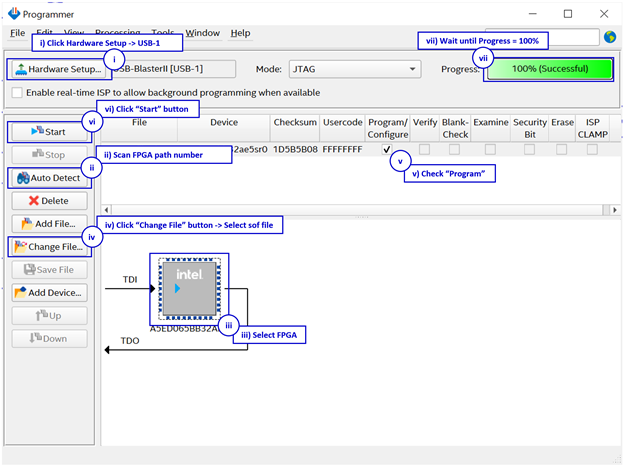
Figure 2 Program Device
3 Running the Demo via JTAG UART terminal
Users can select test mode via JTAG UART terminal displayed in Figure 3. The detailed information of each menu is described in the Test Modes topic.
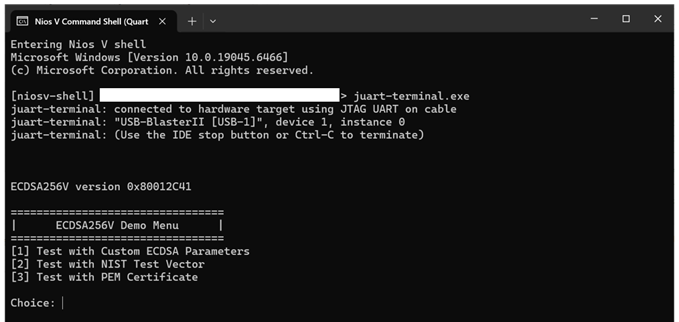
Figure 3 ECDSA256V demo console
4 Test Modes
4.1 Custom ECDSA Parameter Verification
In this test mode, users can verify a signature by manually entering ECDSA parameters through the console menu: Set Qx, Set Qy, Set r, Set s, and Set hash.
Users may input new parameters in hexadecimal format or press ENTER to skip, in which case the current parameter value will be reused and displayed again.
Once the parameters are set as desired, selecting Perform ECDSA Verification starts the ECDSA256V process to verify the signature using the current parameters and displays the verification result, as shown in Figure 4.
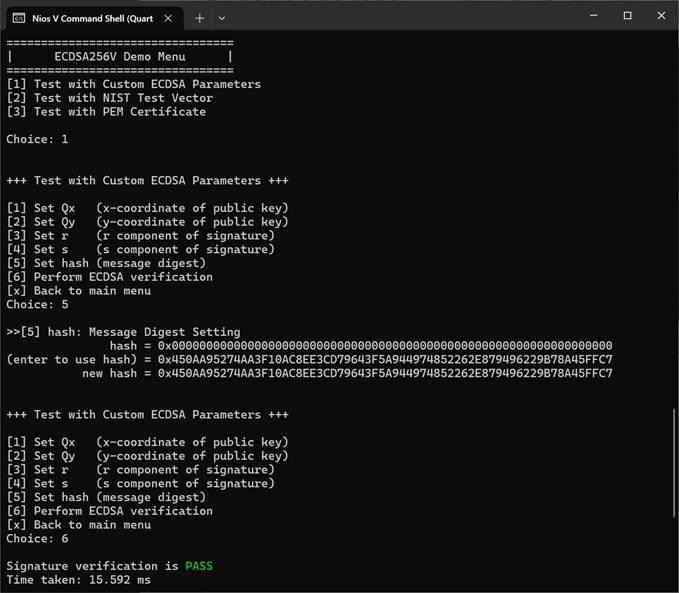
Figure 4 Custom parameters test mode
4.2 NIST Test Vector Verification
In this test mode, users can validate the ECDSA256V-IP using standardized NIST test vectors in RSP format. The system receives input line-by-line through the terminal, following the structure used in the NIST test vector files.
User can copy the test vectors in RSP directly from their source and paste them into the terminal. During data transmission, an on-screen spinner will rotate to indicate that the file transfer is in progress. Users must wait for the file transfer to complete, indicated when the spinner stops rotating, and then press Ctrl+X to signal the end of the file.
CAUTION: Pressing Ctrl+X while the file transfer is still in progress will interrupt the transmission, causing corrupted or incomplete data inputs to the demo.
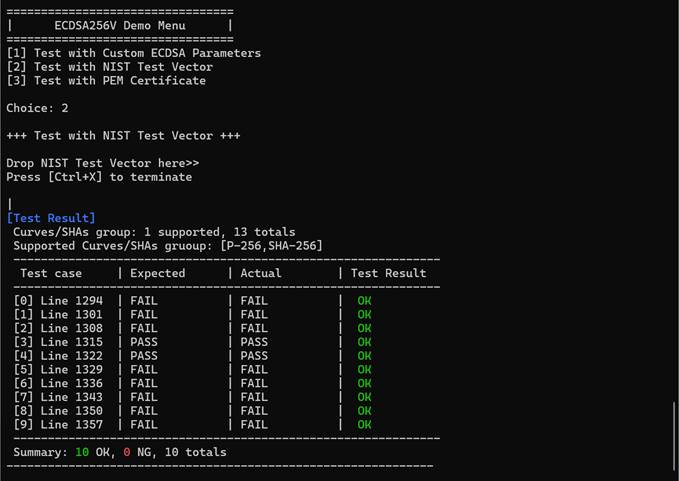
Figure 5 NIST test vector test mode
During the process, the demo parses the test cases from user input. If a group of test cases matches the supported curves (P-256) and hash algorithm (SHA-256), up to 10 test cases will be stored. For each test case, the public key and signature are provided to the ECDSA256V-IP, while the message is hashed by software before being used as input to the IP core.
After completing all tests, the results are displayed in a summary table as shown in Figure 5.
· Test case – Line number where the test case begins in the vector file.
· Expected – Expected verification result specified in the test vector.
· Actual – Verification result produced by the ECDSA256V-IP.
· Test Result – Comparison outcome: “OK” if expected and actual results match, or “NG” if they differ.
Note:
· Official test vectors can be downloaded from the NIST website:
· For convenience, the demo package includes a copy of these vectors under the 186-4ecdsatestvectors folder (last updated: 03-Oct-2025).
· The NIST package contains vectors for key generation, signature generation, and signature verification. For this demo, please use SigVer.rsp files. Other files may be entered through the console, but they do not contain verification cases.
· Due to data transmission latencies inherent to the JTAG UART interface, uploading large test files (e.g., a 713 kB file) may take approximately 5 minutes. Ensure the terminal remains open and undisturbed until the upload completes, then press Ctrl+X to allow the ECDSA256V demo to execute the verification.
4.3 PEM Certificate Verification
This test mode demonstrates a real-world use case of ECDSA256V-IP. Users can input an SSL certificate in PEM format through the terminal. User can copy the PEM certificate and paste them into the terminal as shown in Figure 6. During data transmission, the demo displays the data received from the terminal. Users must wait for the data transfer to complete, indicated when the PEM certificate is printed out completely, and then press Ctrl+X to signal the end of the file.
The demo checks the algorithm and curve of each certificate in the chain and then verifies the certificate chain. Example PEM certificate files are included in the demo package for reference. After processing the chain, the verification results are displayed on the console as shown in Figure 7.
If any certificate in the chain is signed with an unsupported algorithm, the demo will skip that certificate and continue with the next one as shown in Figure 8.
When the certificate chain does not include a root certificate, the demo prompts the user to provide the root’s public key to verify the last certificate. The public key may be entered in uncompressed format, or the user can press ENTER to skip as shown in Figure 9.
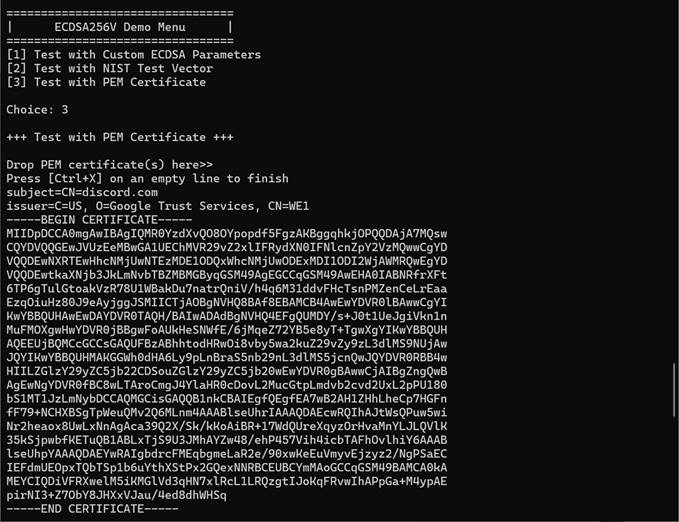
Figure 6 Verification of PEM Certificate Chain
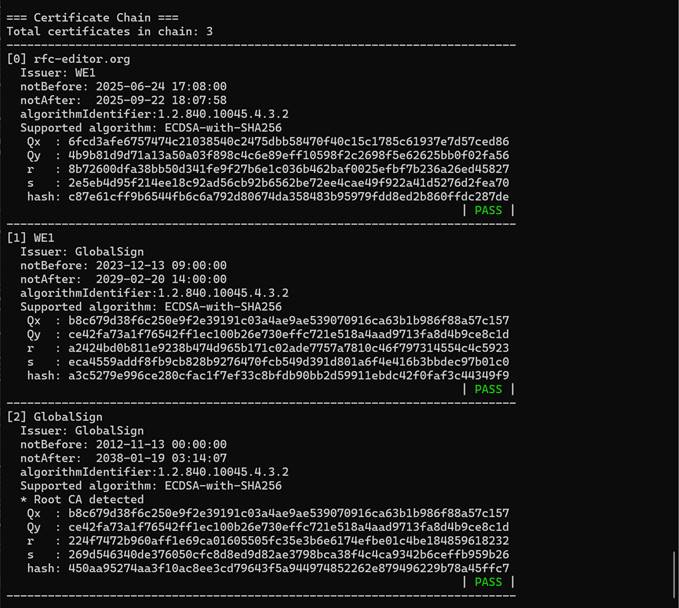
Figure 7 Verification of Certificate with supported Algorithm
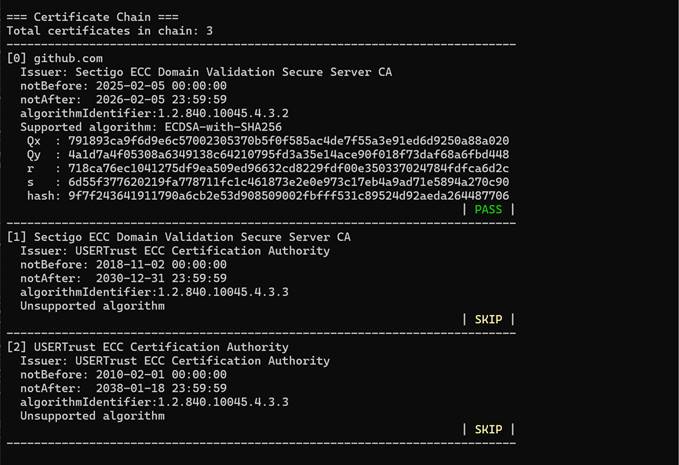
Figure 8 Verification of Certificate with Unsupported Algorithm
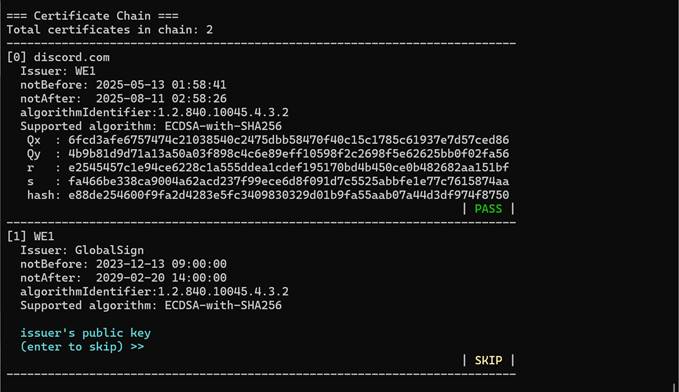
Figure 9 Verification of Certificate Chain without Root Certificate
5 Running the Demo via Graphic user interface
Users can utilize the ecdsa256vDemo-GUI to interface with the FPGA and execute all test modes identically to the serial terminal interface. This GUI includes an integrated file transfer feature, providing enhanced convenience when testing the ECDSA256V-IP with NIST test vectors or PEM certificates.
As shown in Figure 10, users can input commands, values, or configuration choices directly into the text entry field. The input data is transmitted to the demo hardware immediately upon pressing the Enter key.
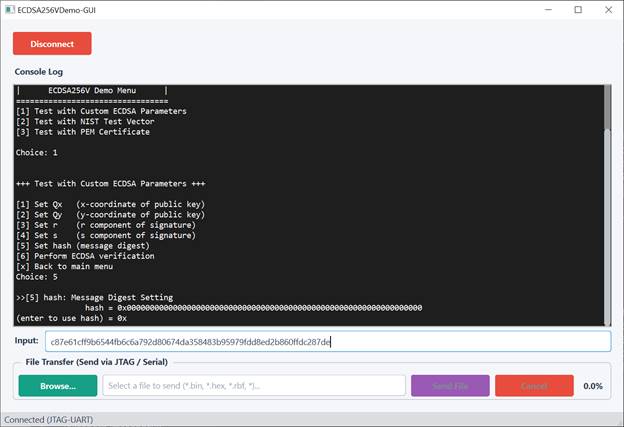
Figure 10 ECDSA256VDemo GUI console
For both the NIST Test Vector Verification and PEM Certificate Verification modes, users can simply browse for the target file and click the Send File button to initiate the data transfer.
Once the file transmission is complete, type for “^x” to signal the end of the file to the ecdsa256vDemo software as shown in Figure 11. The demo application will then execute the selected function and display the results identically to the serial terminal interface as shown in Figure 12.
Note: To support custom application development, the Python source code for the GUI (ECDSA256VDemo-GUI.py) is provided as a reference example. Users may use this code to create their own custom application interface. Please note that Design Gateway does not take responsibility for any issues arising from user-modified code.
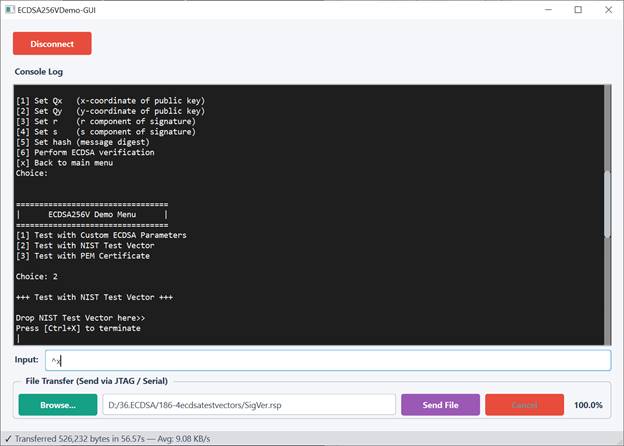
Figure 11 ECDSA256VDemo GUI console after completing a file transfer
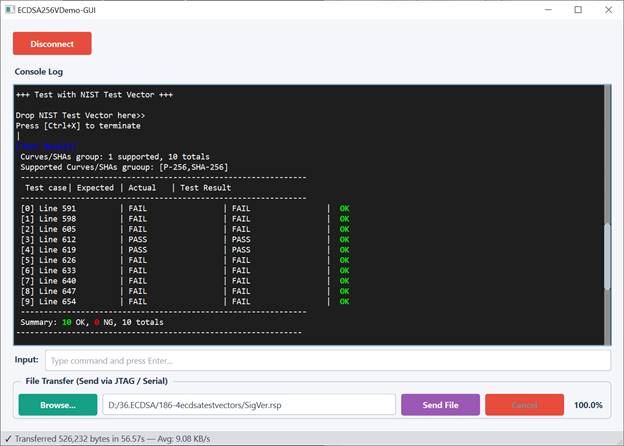
Figure 12 Test result on ECDSA256VDemo GUI console
6 Revision History
|
Revision |
Date (D-M-Y) |
Description |
|
1.00 |
02-Jun-26 |
Initial version release |