exFAT IP for NVMe Demo Instruction
2.1 Format/Secure Format Command
1 Overview
This document details the procedures for operating the exFAT-IP demo on an FPGA development board, facilitating access to an NVMe SSD with exFAT file system capabilities. Users can test the functionality of the following five commands through the test menu: Format, Secure Format, Write file, Read file, and Shutdown.
Begin by setting up the FPGA board and test system as per the instructions in the �dg_nvmeip_fpgasetup� document. Access this document at the following link.
https://dgway.com/products/IP/NVMe-IP/dg_nvmeip_fpgasetup_xilinx_en/
Upon the completion of configuration file downloading to the FPGA, a welcome message will appear, as illustrated in Figure 1‑1.
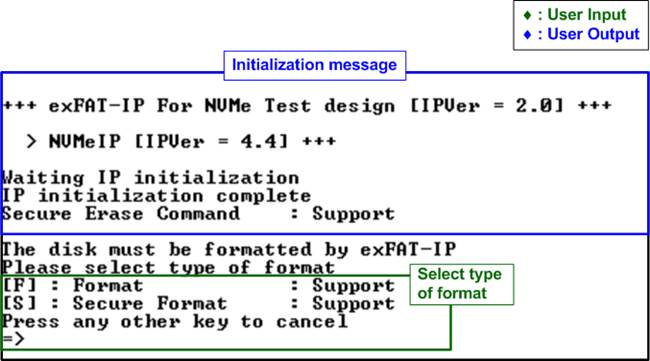
Figure 1‑1 exFAT-IP initialization message
This welcome screen outlines the IP�s name, version number, a confirmation of the completion for IP initialization, and the SSD�s Secure Erase command compatibility. Users are prompted to format the disk, with three options: Format (F), Secure Format (S), or bypass the formatting process (other keys). In specific SSD that does not support Secure Erase command, the Secure Format cannot be executed.
For SSDs not previously formatted by the exFAT-IP, selection of Format or Secure Format is mandatory. Subsequent to formatting, disk system information is displayed, such as file size, maximum number of files in the disk, maximum number of files for each directory, and total number of available files in the disk, as shown in Figure 1‑2. The IP then enters a ready state for command input.

Figure 1‑2 Initialization complete with and without Format operation
The main menu presents four options for interacting with the exFAT-IP. Detailed explanations of each menu item will follow in subsequent sections.
2 Test Menu
2.1 Format/Secure Format Command
Select �0� from the main menu to initiate the Format process of exFAT-IP. The console will present two formatting options: Format and Secure Format. It will also indicate whether the disk supports these commands.
a) Format Command: Executes standard formatting.
b) Secure Format Command: Include an erase operation ensuring all deleted data is irrecoverable, addressing security concerns. On certain SSDs, this function can also enhance transfer performance, which might decrease after extensive data storage.
Execution steps for Format and Secure Format are as follows.

Figure 2‑1 (Secure) Format menu
1) Select Format Type:
a) Press �F� for Format.
b) Press �S� for Secure Format.
c) Press any other key to cancel the command. The action cancels the �(Secure) Format� submenu and returns you to the main menu.
If a Format option is selected, the system will display the default created date and time for empty directories formed created during the process
2) Set Created Date and Time:
a) Press �y� to input a new created date and time.
b) Press any other key (e.g., �n�) to retain the default values.
After setting the date and time, the console will list all supported file sizes for the disk.
3) Select the disk�s file size from the provided options. After a valid selection, Format or Secure Format process will begin.
During the (Secure) Format operation, the message �Format operation begin� will appear. The operation�s progress is indicated by a dot (.) printed on the console. Upon completion, �Format disk complete� will be displayed, along with the total duration of the format process.
Note: As illustrated in Figure 2‑1, the Secure Format typically takes longer than the standard Format due to the additional erase operation.
Upon successfully formatting a disk with exFAT-IP and connecting it to a PC, the system recognizes the DG_exFAT drive, displaying 512 empty directories ranging from DIR000 (the first directory) to DIR1FF (the 512th directory). The modified date of these directories matches the created date specified during the formatting process.
Note: When the formatted disk is connected to a PC, avoid creating, writing to, or modifying data on the disk. Any such modifications necessitate reformatting the disk with exFAT-IP.
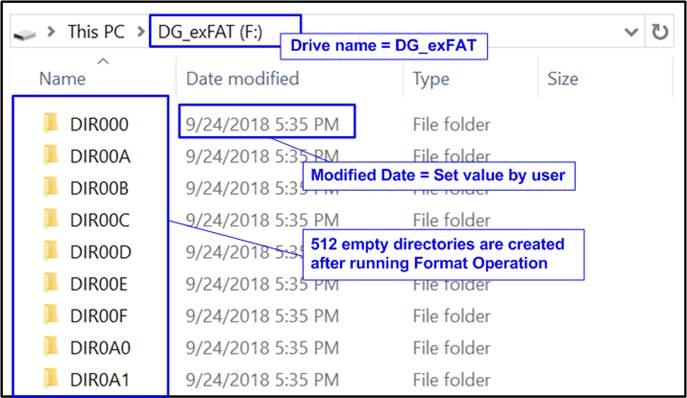
Figure 2‑2 512 Empty directories after the Format completion
If an incorrect file size is entered during the formatting process, and error message will appear, and the Format process will be aborted, as illustrated in Figure 2‑3.
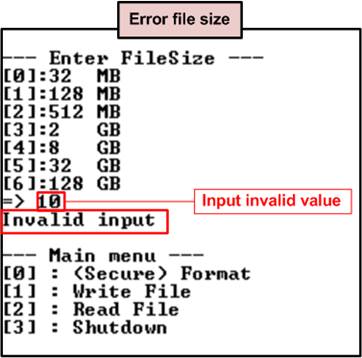
Figure 2‑3 Error message when an invalid file size is received
2.2 Write File
Select option �1� to initiate the Write file operation by executing these following steps.
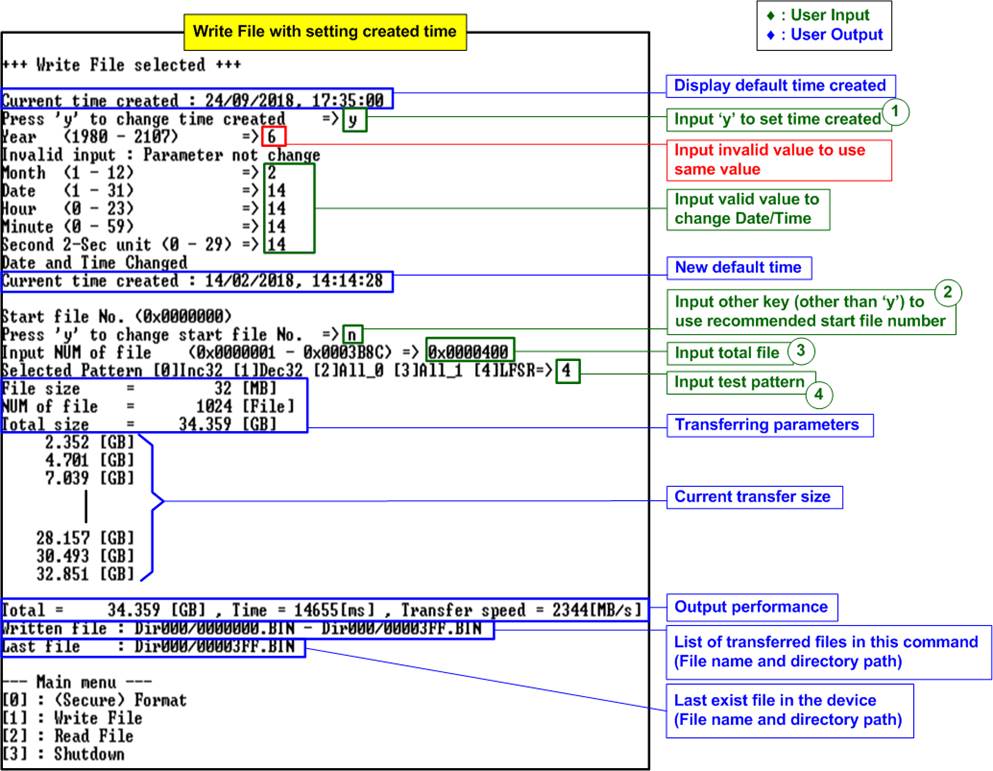
Figure 2‑4 Write File menu with setting created time
Refer to Figure 2‑4 for a step-by-step guide on executing the Write file command, which requires four input parameters.
1) Setting the Created Date and Time: Press �y� to modify the created date and time for new files or use any other key for the default value. If updating, specify the following parameters.
b) Month : Range 1 � 12.
c) Date : Range 1 � 31.
d) Hour : Range 0 � 23.
e) Minute : Range 0 � 59.
f) Second : Second multiplied by 2, range 0 � 29.
Use decimal as default; prefix �0x� for hexadecimal. Invalid inputs will be ignored, keeping the previous value. A �Date and Time changed� confirmation message will show the new value. Subsequently, the console will suggest a start file number based on the last Write file command.
2) Setting Start file number: Press any key other than �y� to use the recommended number. To overwrite old files, press �y� and input a new number, less than the recommended value. Overwriting replaces the old data with new.
3) Number of files: Specify the total number of files to be written. Input decimal value or prefix �0x� for hexadecimal.
4) Test pattern: Choose from 32-bit incremental, 32-bit decremental, all-0, all-1, and 32-bit LFSR counter.
Once all inputs are confirmed, the console previews the transfer parameters. During execution, the written data amount is shown every second. When the operation is completed, the console displays the total size, total time usage, and test speed.
After the Write file command concludes, the data is stored on the SSD in file format, with names spanning from the first file number (set in step 2) to the last file number (Start file number + Number of files � 1). The file name is defined by seven hexadecimal digits. Since the number of files per directory is limited, new files might be distributed across directories. The console will display the names and directory paths of the new files as a concluding message.
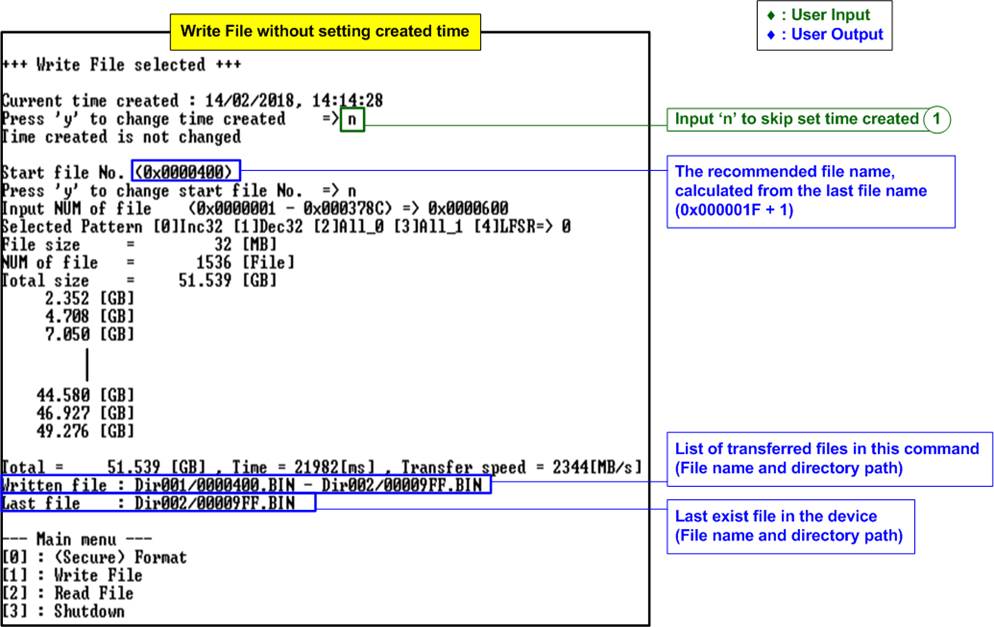
Figure 2‑5 Write file without setting created time
Figure 2‑5 presents an example of executing a subsequent Write file command where the created date and time are not modified. After the operation concludes, the new file names sequentially follow those from the previous command (with the last file named �000003FF.BIN�), starting with �00000400.BIN� and ending with �000009FF.BIN�.
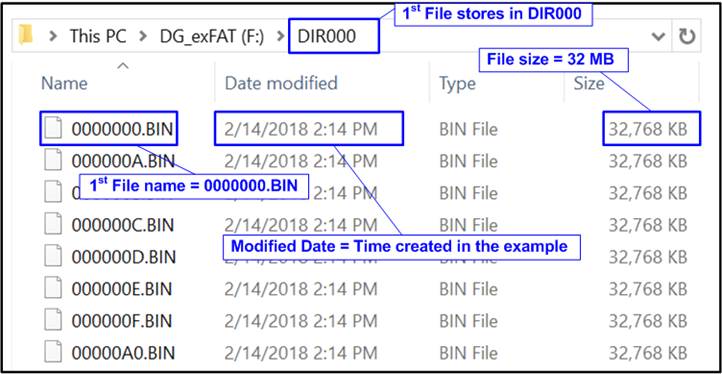
Figure 2‑6 Example test files written by Write file command
When the SSD is connected to a PC, the system will recognize files within the DG_exFAT drive�s subdirectory. The first file, 0000000.BIN, is located in DIR000. The file size corresponds with the value set during the Format command, and the modified date for each file matches the created date and time set during the Write File command.
Note: Please refrain from creating, writing, or modifying data on the SSD
when it is connected to a PC. If any modifications occur, the SSD will require
reformatting with exFAT-IP to maintain integrity.

Figure 2‑7 Test data in sector#0 - #1 of file �0000000.BIN� by increment/LFSR pattern
Test data is split into 512-byte segments. For incremental, decremental, or LFSR pattern, each segment includes a unique 64-bit header consisting of a 48-bit address (derived from <file name x file size> + file offset) and 16-bit zero value, ensuring a distinct address for every 512-byte segment. The unique header is not included in the all-0 or all-1 patterns.
The data following the 64-bit header will display the selected test pattern. For instance, in Figure 2‑7, the left window illustrates data in file �0000000.BIN� with an incremental pattern, while the right window depicts the LFSR pattern. The header (byte#0-byte#7) remains consistent across test patterns, followed by the specific test data (incremental, decremental, and LFSR).
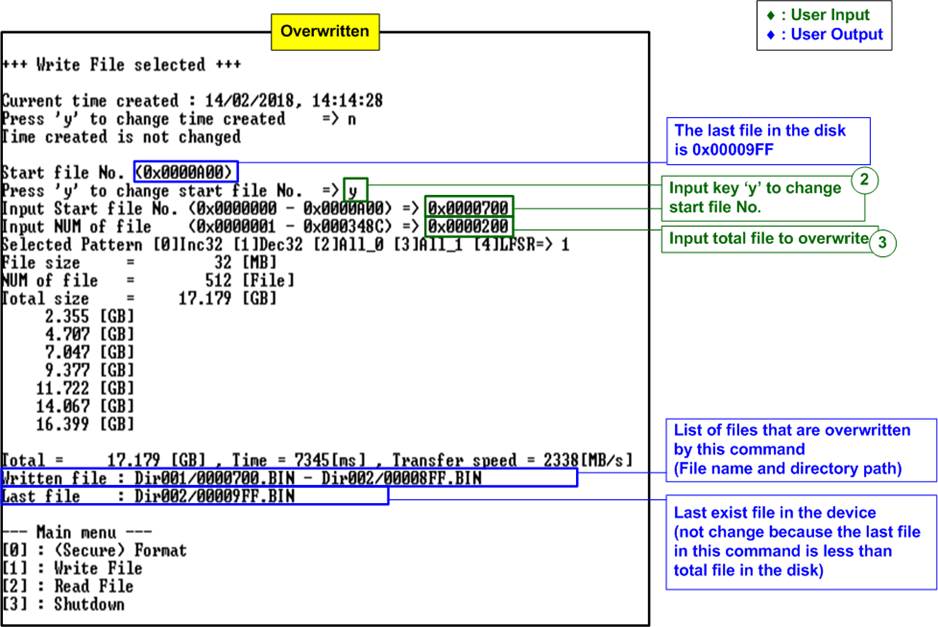
Figure 2‑8 Set new start file No. to overwrite file
Figure 2‑8 illustrates an example of overwriting files by setting the Start file number to value less than the default settings. Initially, the last file on the SSD is �00009FF.BIN�. However, the overwrite operation writes the files from �0000700.BIN� to �00008FF.BIN�, rewriting them using a decremental pattern while the original files were written using an incremental pattern.
Upon completion of the operation, the data within the range of �0000700.BIN� to �00008FF.BIN� follows a decremental pattern. Because the last file written in the new command (00008FF.BIN) is numerically less than the previously last file on the device (00009FF.BIN), the display of the last file on the console remains unchanged. Otherwise, the console would update to show the last file as being the final file from this overwrite test.
Figure 2‑9 provides an example of the error messages that appear when inputs of any parameter are out of the recommended range. After an �Invalid input� message is displayed on the console, the system will revert to the main menu.

Figure 2‑9 Error message from the invalid input of the Write file command
2.3 Read File
Select option �2� to initiate the Read file operation by executing these following steps.

Figure 2‑10 Read file menu when verification is successful
To execute the Read file command, the user need to input the following five parameters.
1) Start file number: Set the starting file number for the read operation, within the range of 0 to (total number of files on the disk � 1). Default input is decimal as default; use prefix �0x� for hexadecimal.
2) Number of files: Specify the total number of files to read. Enter a decimal value or prefix with �0x� for hexadecimal input.
3) Test pattern: Select a verification pattern that corresponds with the one used in the Write file command. Five options include 32-bit incremental, 32-bit decremental, all-0, all-1, and 32-bit LFSR counter.
After confirming the inputs are confirmed, the console previews the transfer parameters. During execution, the amount of data read is shown every second. Upon completion, the console displays the total size, and total time usage of the operation. The final step includes displaying the names and directory paths of the files involved in the transfer before returning to the main menu.
If invalid inputs are entered, an �Invalid input� message is displayed, and the command is cancelled, similar to the Write File command�s behavior.
If the Read file command encounters a data verification failure, an error message, �Verify fail�, is displayed as depicted in Figure 2‑11. This message includes the name of the first file where the error occurred, the specific address within that file, the expected data, and the actual data read.
User can interrupt the read operation at any time after data verification failure by pressing any key(s), or choose to wait until the read process completes.
After the read process completes, the console displays the output performance as a test result. The user may continue system testing if the error was due to an incorrect test patter input. Otherwise, if the command fails to complete properly, resetting the system to initiate a new test operation is recommended.
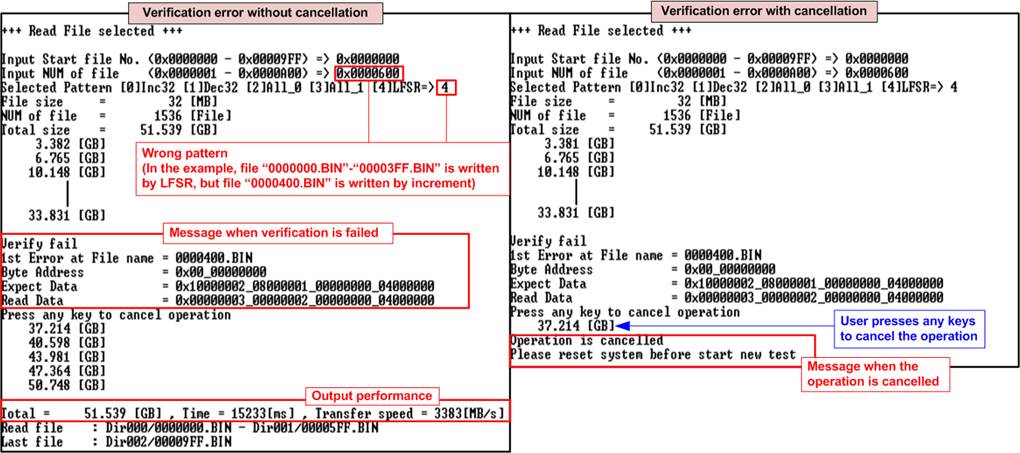
Figure 2‑11 Data verification failure
2.4 Shutdown Command
Select option �3� to initiate the Shutdown command. This command forces the exFAT-IP and the connected SSD inactive.
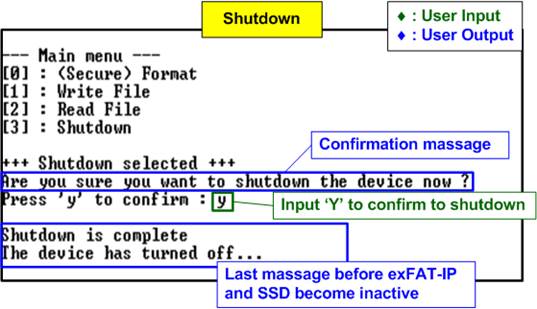
Figure 2‑12 Shutdown Command with confirmation
When initiating the Shutdown operation, a confirmation message will appear on the console. To proceed with the shutdown, the user inputs �y� or �Y�. Any other key will cancel the operation. After the command executes successfully, the console will display the message �Shutdown command is complete�, indicating the system has been properly shut down.
3 Revision History
|
Revision |
Date |
Description |
|
3.00 |
7-May-24 |
Add Secure Format feature |
|
2.01 |
14-Mar-22 |
Correct Figure index |
|
2.00 |
23-Jul-20 |
Remove FPGA setup from the document |
|
1.04 |
20-Apr-20 |
Remove power adapter cable from AB18 |
|
1.03 |
20-Feb-20 |
Support VCU118 board |
|
1.02 |
16-May-19 |
Correct directory name and update overwritten feature |
|
1.01 |
22-Mar-19 |
Add file size and total file information |
|
1.00 |
16-Jan-19 |
Initial version release |