1 Introduction
This document describes how to setup FPGA board and test environment for running NVMeTCP10G-IP demo. The user can setup the test environment for accessing target NVMe SSD on Test PC across 10Gb Ethernet as shown in Figure 1‑1.
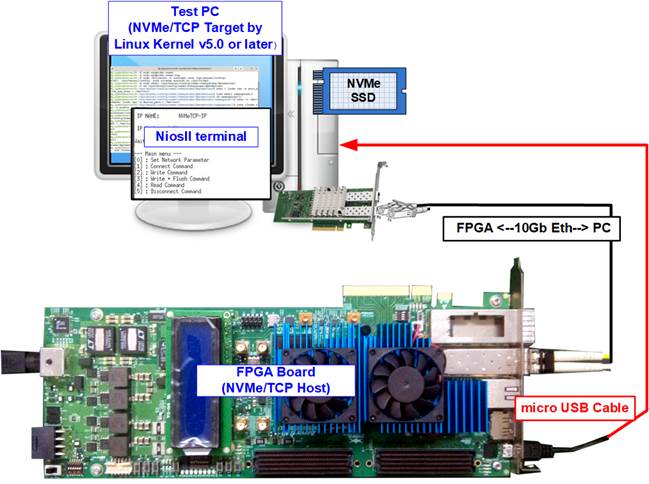
Figure 1‑1 Test environment for running the demo
FPGA board runs NVMeTCP10G-IP for the host operation while Test PC integrates 10Gb Ethernet card and one NVMe SSD to be NVMe/TCP target. Test PC installs LinuxOS with the kernel version 5.0 or later to support NVMe/TCP protocol. Also, NiosII terminal is run on Test PC to be user interface console.
Before running the test, please prepare following test environment.
- FPGA development boards: Arria10 GX FPGA Development Kit
- Test PC
i) Installed Linux kernel version 5.0 or later.
ii) Plug in with one NVMe SSD
iii) Plug in with 10 Gigabit Ethernet card
- 10 Gb Ethernet cable: 10 Gb SFP+ Active Optical Cable (AOC Cable) or 10Gb SFP+ transceivers (10G BASE-R) with optical cable (LC to LC, Multimode)
- micro USB cable for JTAG connection between FPGA board and PC
- QuartusII Programmer and NiosII command shell, installed on PC
Note: Example hardware for running the demo is listed as follows.
[1] 10G Network Adapter: Intel X710-DA2
[2] 10-Gigabit SFP+ AOC cable (AOC-S1S1-001)
https://www.10gtek.com/10gsfp+aoc
[3] PC: Motherboard ASUS Z170-K, 64 GB RAM, and LinuxOS with kernel version 5.4.0-81
[4] Target NVMe SSD in PC: 512 GB Samsung 960 Pro

Figure 1‑2 NVMeTCP10G-IP demo on Arria10 GX
2 Demo setup
This topic describes the details to set up test environment for running the demo.
1) Turn off power switch and connect power supply to FPGA board.
2) Connect micro USB cable from FPGA board to PC for JTAG programming and JTAG UART

Figure 2‑1 Power connection and microUSB connection
3) Connect 10Gb Ethernet cable by asserting 10Gb SFP+ transceiver with LC-LC cable between FPGA board and PC.

Figure 2‑2 10Gb Ethernet connection
4) Turn on power switch on FPGA board.
5) Open QuartusII Programmer to program FPGA through USB-1 by following step.
i. Click “Hardware Setup…” to select USB-BlasterII[USB-1].
ii. Click “Auto Detect” and select FPGA number.
iii. Select Arria 10 device icon.
iv. Click “Change File” button, select SOF file in pop-up window and click “open” button.
v. Check “program”.
vi. Click “Start” button to program FPGA.
vii. Wait until Progress status is equal to 100%.
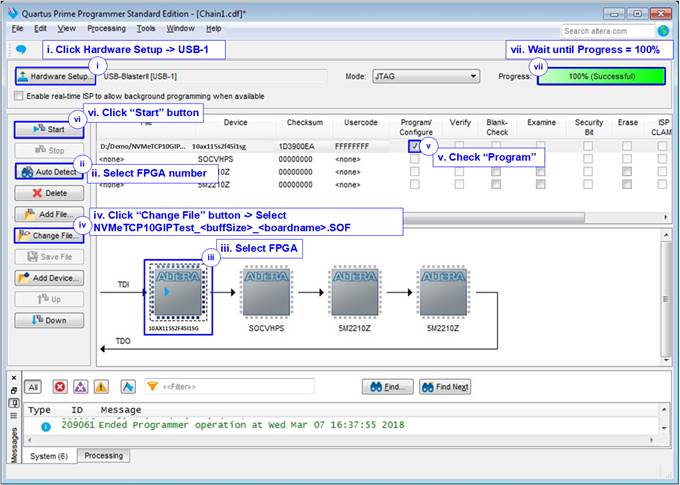
Figure 2‑3 FPGA Programmer
6) Open NiosII command shell and Type “nios2-terminal” to run the console.

Figure 2‑4 Run NiosII terminal
7) After finishing FPGA configuration, welcome message is displayed.

Figure 2‑5 Welcome screen
3 Revision History
|
Revision |
Date |
Description |
|
1.0 |
24-Mar-22 |
Initial version release |