SocketXpress with TCP/IP accelerator Instruction
1.3.2 Speed and Duplex Setting
1.3.3 Network Properties Setting
2.1.1 Client Tx Throughput Testing
2.1.2 Client Tx Data Verification Testing
2.1.3 Client Rx Throughput Testing
2.1.4 Client Rx Data Verification Testing
Design Gateway presents a demonstration showcasing SocketXpress, custom Linux network socket C library which work with Design Gateway's TCP Offload Engine (TOE10GLL-IP) that offloads TCP tasks from CPU. A custom ubuntu Kria KR260 Robotics Starter Kit SD card image is provided, enabling users to easily deploy the setup on the KR260 and achieve higher TCP data transfer speeds while preserving the same user experience.
This document provides instructions for using the SocketXpress library with socket-based applications without recompilation on the KR260. In this demonstration, we show web page retrieval using curl and Lynx. It is divided into two main sections: environment setup and demonstration.
1 Environment Setup
An overview of the test environment is shown as Figure 1. The setup includes the KR260 board and a test PC connected to each other. Users can test socket-based applications with either standard Linux socket or SocketXpress. This setup facilitates data transfer through the 10G Ethernet path for performance evaluation.
1.1 Test Environment
To operate SocketXpress demo on KR260, please prepare following test environment.
1) FPGA development boards (KR260 board).
2) Test PC with 10 Gigabit Ethernet or connecting with 10 Gigabit Ethernet card.
3) 10 Gb Ethernet cable:
a) 10 Gb SFP+ Passive Direct Attach Cable (DAC) which has 1-m or less length
b) 10 Gb SFP+ Active Optical Cable (AOC)
c) 2x10 Gb SFP+ transceiver (10G BASE-R) with optical cable (LC to LC, Multimode)
4) Micro USB cable for UART connection connecting between KR260 board and Host PC.
5) Serial console software such as TeraTerm installed on PC. The setting on the console is Baud rate=115200, Data=8-bit, Non-parity and Stop=1.
6) SD card image provided by Design Gateway for running on KR260.
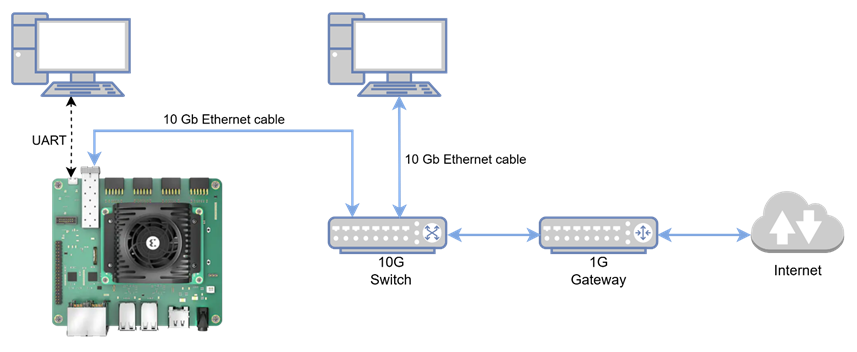
Figure 1 SocketXpress demo on KR260 board test environment
1.2 KR260 Setup
Flash the provided Ubuntu image to the SD card, boot the KR260 with the card and everything is set.
Default login credentials:
username: ubuntu
password: kriakr260
Verify hardware and link status using the following commands:
1) Check for driver status.
> sudo dmesg | grep DG
If the 10G Ethernet interface is linked up and the device driver has detected the hardware, the result should be as shown in Figure 2.
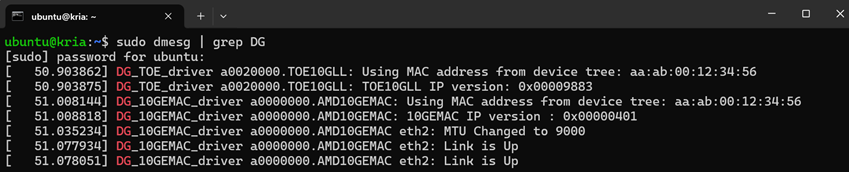
Figure 2 KR260 Hardware Detection and Link Status
2) Check for 10G Ethernet interface link status.
> ifconfig eth2
When the 10G Ethernet interface is linked up, the status will show "RUNNING." If you connect to the gateway, you should receive an IP address from DHCP, as shown in Figure 3.
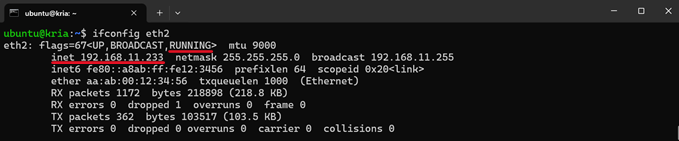
Figure 3 10G Ethernet interface Status
1.3 PC Setup
When connecting to the internet, data transfer may be slower due to external network conditions. By connecting to a server within the same subnet, we can ensure that data is transferred exclusively through the 10G Ethernet, allowing for controlled and consistent testing conditions.
This demonstration showcases running TCP C program throughput testing server on Test PC. Before running demo, please check the network setting on PC. The example of setting 10 Gb Ethernet card is described as follows.
1.3.1 IP Setting
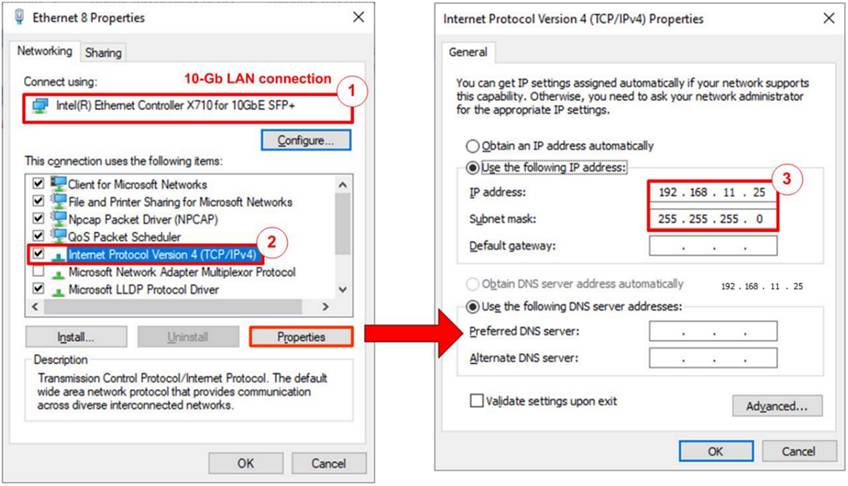
Figure 4 Setting IP address for PC
1) Open Local Area Connection Properties of 10 Gb connection, as shown in the left window of Figure 4.
2) Select “TCP/IPv4” and then click Properties.
3) Set IP address = 192.168.11.25 and Subnet mask = 255.255.255.0, as shown in the right window of Figure 4.
1.3.2 Speed and Duplex Setting
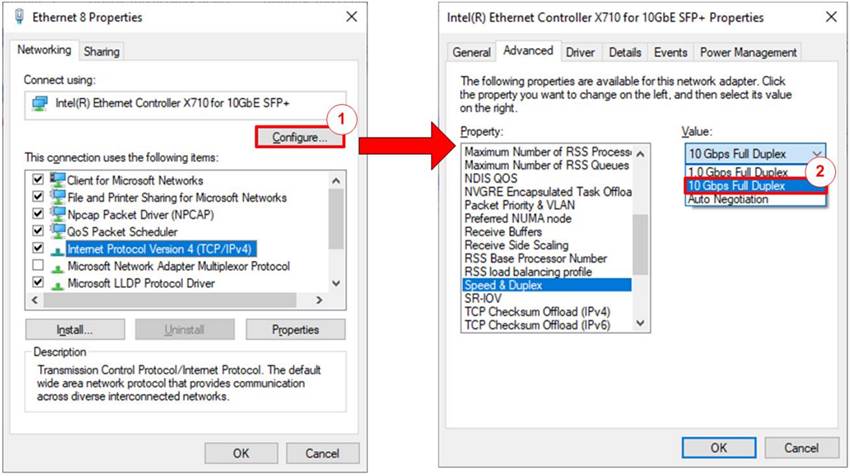
Figure 5 Set Link Speed = 10 Gbps
1) On Local Area Connection Properties window, click “Configure”, as shown in Figure 5.
2) On Advanced Tab, select “Speed and Duplex”. Set the value to “10 Gbps Full Duplex” for running 10 Gigabit transfer test, as shown in Figure 5.
1.3.3 Network Properties Setting
Some of network parameter setting may affect to network performance. The example of network properties setting as follows.
1) On “Interrupt Moderation” window, select “Disabled” to disable interrupt moderation which would minimize the latency during transferring data, as shown in Figure 6.
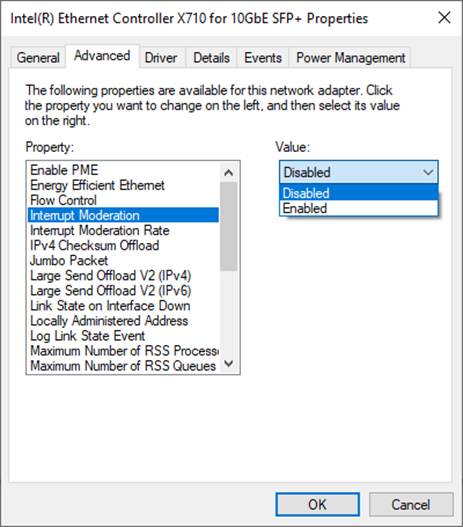
Figure 6 Interrupt Moderation
2) On “Interrupt Moderation Rate” window, set value to “OFF”, as shown in Figure 7.
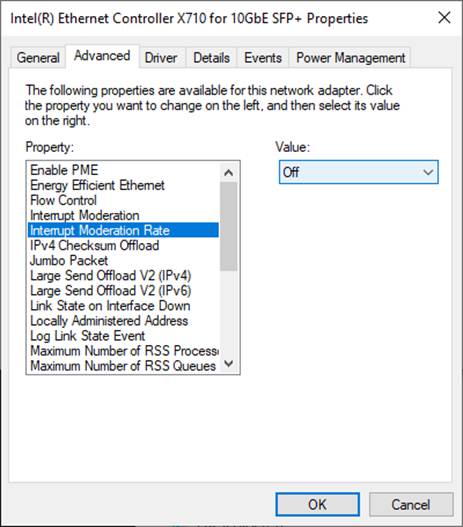
Figure 7 Interrupt Moderation Rate
3) On “Jumbo packet” window, set value to “9014 Bytes”, as shown in Figure 8.
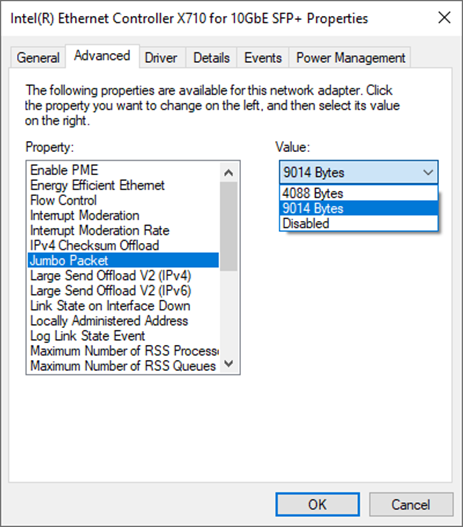
Figure 8 Jumbo packet
4) On “Receive Buffers” window, set value to the maximum value, as shown in Figure 9.
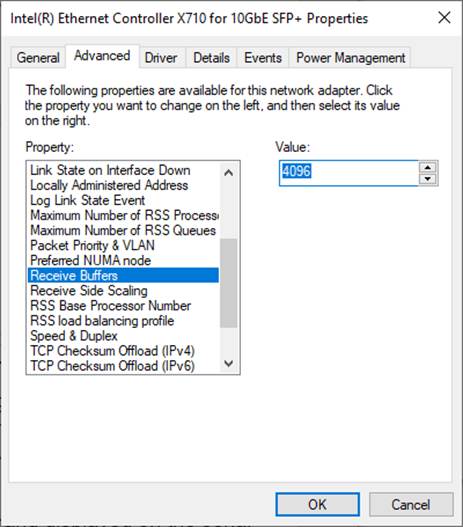
Figure 9 Receive Buffers
5) On “Transmit Buffers” window, set value to the maximum value, as shown in Figure 10.
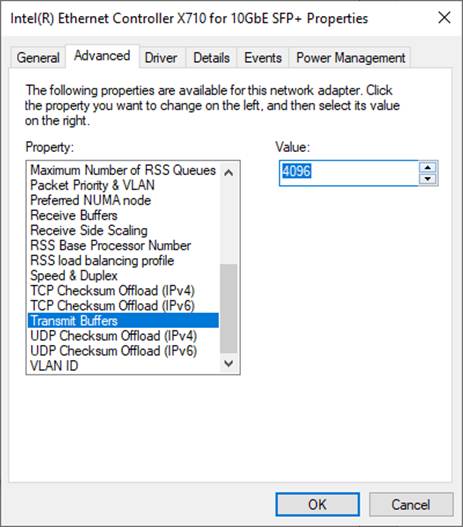
Figure 10 Transmit buffers
2 Demonstration
This section guides you through running the provided TCP testing C program and other existing applications such as lynx and curl to demonstrate how applications implemented with standard Linux socket library can be easily switched to use the SocketXpress library.
SocketXpress library will be used via LD_PRELOAD to replace standard Linux socket without recompiling application. Required parameters not provided by the application can be set through environment variables:
> [Environment variables] LD_PRELOAD=libSocketXpress.so <Application>
Environment variables:
SOURCE_IP=<TOE IP>[/subnet_mask]
Specify source IP address for TOE10GLL operations with optional subnet mask.
TARGET_IP=<Host IP>
Specify target IP address when using FPGA as a server
SOURCE_PORT=<TOE Port>
Specify source port to TOE10GLL. Default: 60000 for applications that do not specify port; will increment for each new connection.
GATEWAY_IP=<Gateway IP>
Specify the gateway IP address when the communication requires routing through a specific gateway. Default: Using Gateway IP from Linux ARP table.
TX_COMBINE=<1|true>
Disable packet merging to reduce latency. Default is enabled for higher throughput.
STS_LOG=<0|false>
Enable status logging to terminal. Default is disable.
Note: Application arguments take priority over these additional parameters.
2.1 TCP Testing C Program
Use the provided TCP testing C program located in directory Software/speedtest_c to measure throughput between the KR260 board and Host PC.
To compile and run the program use following command:
For Windows:
> gcc -o TCP.exe TCP.c -lws2_32
For Linux:
> gcc -o TCP TCP.c
This TCP testing C program is capable of testing throughput and verifying data. The available command-line arguments can be viewed using the TCP program with -h option, as demonstrated in Figure 11.
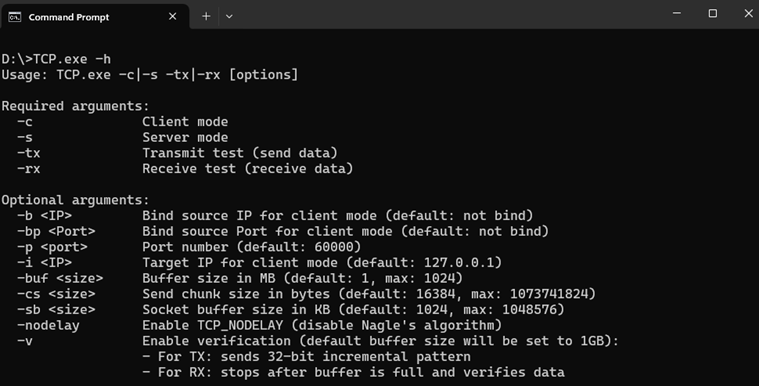
Figure 11 TCP testing C program
usages
2.1.1 Client Tx Throughput Testing
Start Server on Host PC by run TCP program in Rx mode on the Host PC using the following command:
> TCP.exe -s -rx -p <Host Port>
The TCP server will open on the specified port (in this example, Host Port 60001), as shown in Figure 12.
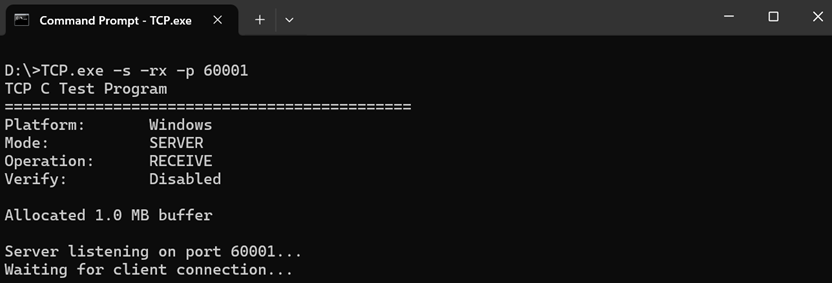
Figure 12 Rx Server opened on host PC
Then on FPGA board, run the program with the standard Linux socket library:
> ./TCP -c -tx -i <Host IP> -p <Host port>
Data transmission will start using the 10GEMAC interface and standard Linux socket. When complete, press Ctrl+C to stop the program, result is shown in Figure 13
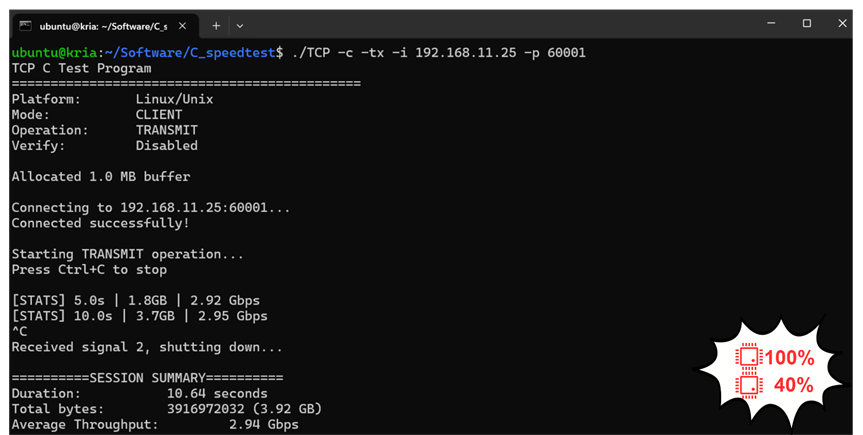
Figure 13 Transmission result with standard Linux socket on 10G Ethernet connection
To run the program with the SocketXpress library:
> LD_PRELOAD=libSocketXpress.so ./TCP -c -tx -b <TOE IP> -i <Host IP> -p <Host port>
Note: The <TOE IP> should be different from 10G ethernet IP address.
Data transmission will start using the 10GEMAC interface and TOE10GLL-IP with SocketXpress. When complete, press Ctrl+C to stop the program, result is shown in Figure 14. With hardware acceleration enabled, the CPU offloaded TCP processing tasks to the TOE10GLL-IP, achieving significantly higher transmission throughput while reducing CPU utilization.
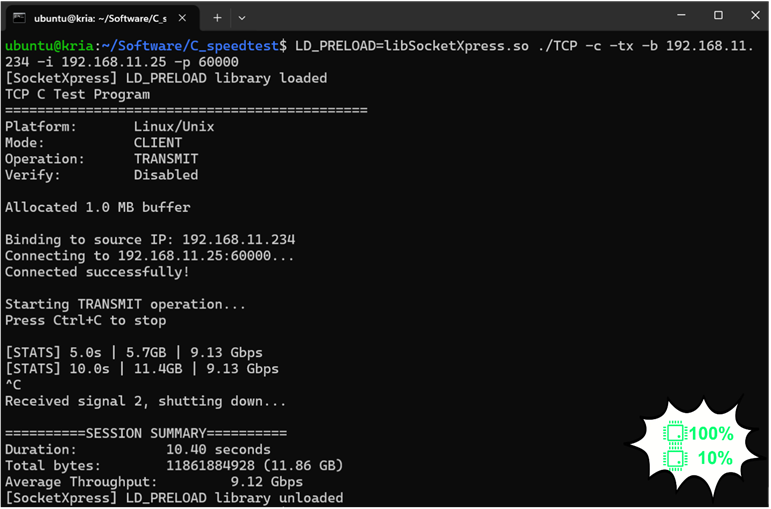
Figure 14 Transmission result with SocketXpress on 10G Ethernet connection
2.1.2 Client Tx Data Verification Testing
Users can verify the data pattern transferred by adding the -v argument in the command line, as described below. Please note that enabling this verification will reduce the transfer speed.
Start Server on Host PC in verification mode:
> TCP.exe -s -rx -p <Host Port> -v
The TCP server will open on the specified port (in this example, Host Port 60001) and prepare to receive data as shown in Figure 15.
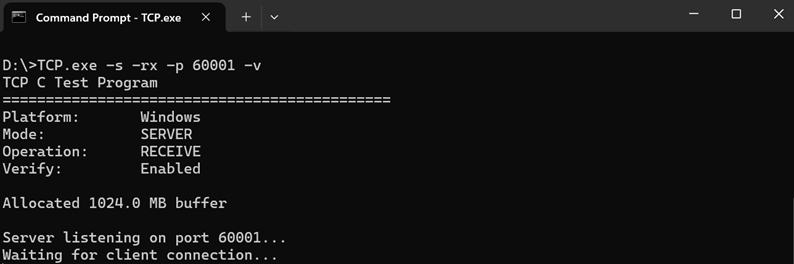
Figure 15 RX Server opened in verification mode on host PC
On FPGA board, run the program with SocketXpress and verification enabled:
> LD_PRELOAD=libSocketXpress.so ./TCP -c -tx -b <TOE IP> -i <Host IP> -p <Host port> -v
The client will transmit data using a 32-bit incremental pattern, and the server will verify the received data integrity. The program will automatically stop after the buffer is full and display verification results as shown in Figure 16, confirming data accuracy while maintaining hardware acceleration benefits through the TOE10GLL-IP.
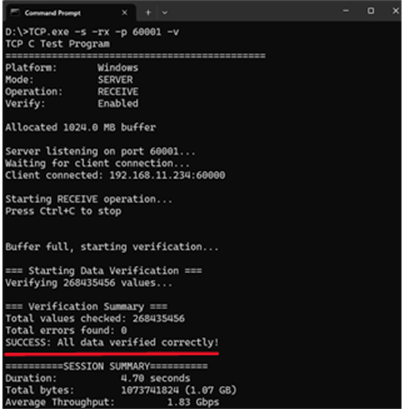
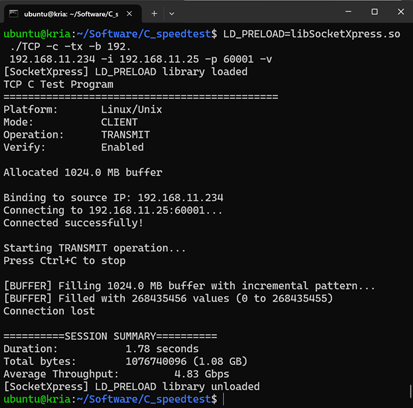
Figure 16 Data verification test result with SocketXpress
2.1.3 Client Rx Throughput Testing
Start Server on Host PC by run TCP program in Tx mode on the Host PC using the following command:
> TCP.exe -s -tx -p <Host Port>
The TCP server will open on the specified port (in this example, Host Port 60001), as shown in Figure 17.
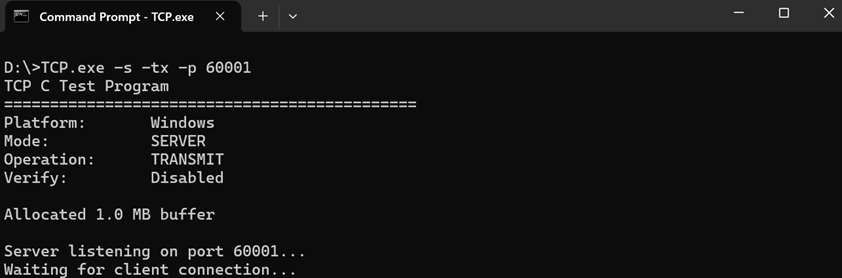
Figure 17 Tx Server opened on host PC
Then on FPGA board, run the program with the standard Linux socket library:
>./TCP -c -rx -i <Host IP> -p <Host Port>
Data Receive will start using the 10GEMAC interface and standard Linux socket. When complete, press Ctrl+C to stop the program, result is shown in Figure 18.
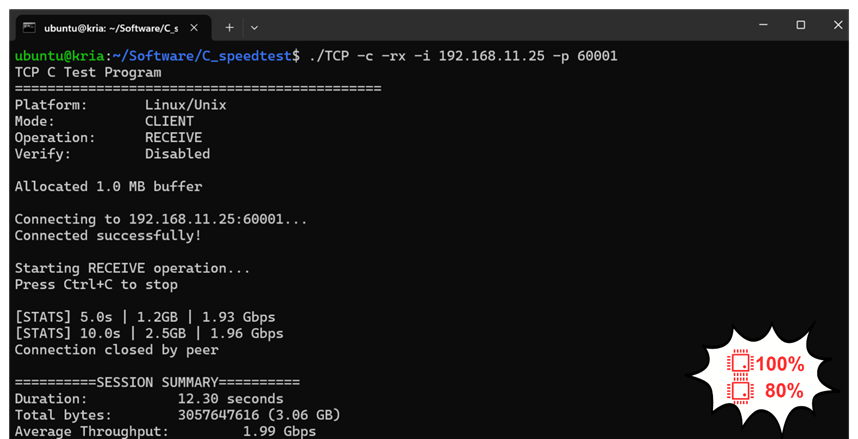
Figure 18 Receiving result with standard Linux socket on 10G Ethernet connection
To run the program with the SocketXpress library:
> LD_PRELOAD=libSocketXpress.so ./TCP -c -rx -b <TOE IP> -i <Host IP> -p <Host Port>
Note: The <TOE IP> should be different from 10G ethernet IP address.
Data receive will start using the 10GEMAC interface and TOE10GLL-IP with SocketXpress. When complete, press Ctrl+C to stop the program, result is shown in Figure 19. With hardware acceleration enabled, the CPU offloaded TCP processing tasks to the TOE10GLL-IP, achieving significantly higher receiving throughput while reducing CPU utilization.
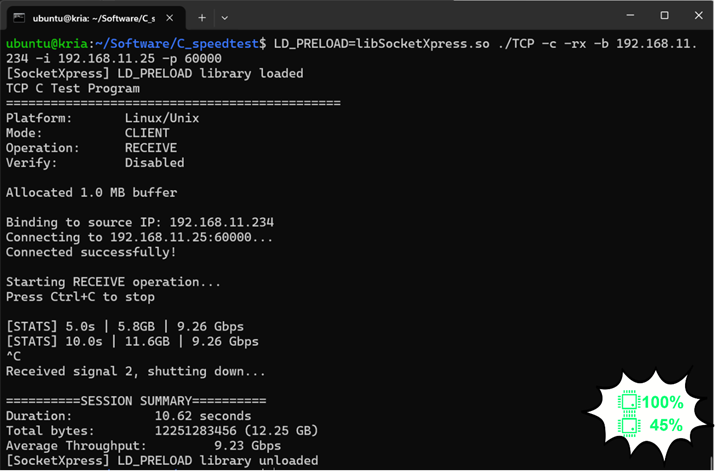
Figure 19 Receiving result with SocketXpress on 10G Ethernet connection
2.1.4 Client Rx Data Verification Testing
Users can verify the received data pattern by adding the -v argument in the command line, as described below. Please note that enabling this verification will reduce the transfer speed.
Start Server on Host PC in verification mode:
> TCP.exe -s -tx -p <Host Port> -v
The TCP server will open on the specified port (in this example, Host Port 60001) and prepare to transmit data with a 32-bit incremental pattern for verification purposes shown in Figure 20.
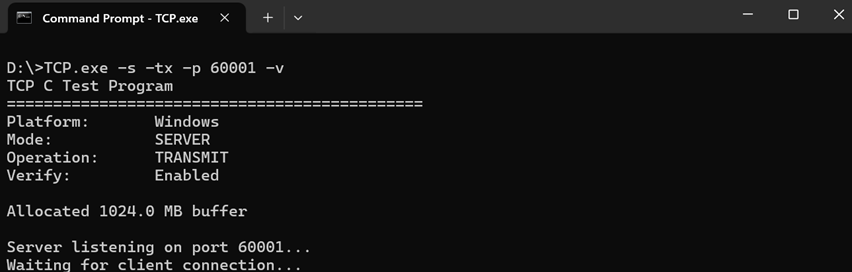
Figure 20 TX Server opened in verification mode on host PC
On FPGA board, run the program with SocketXpress and verification enabled:
> LD_PRELOAD=libSocketXpress.so ./TCP -c -rx -b <TOE IP> -i <Host IP> -p <Host port> -v
Data reception will start using the 10GEMAC interface and TOE10GLL-IP with SocketXpress. The server will transmit data using a 32-bit incremental pattern, and the client will receive and verify the data integrity. The program will automatically stop after the buffer is full and display verification results as shown in Figure 21, confirming data accuracy while maintaining hardware acceleration benefits through the TOE10GLL-IP.
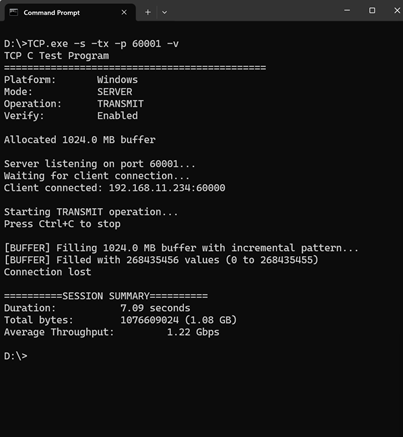
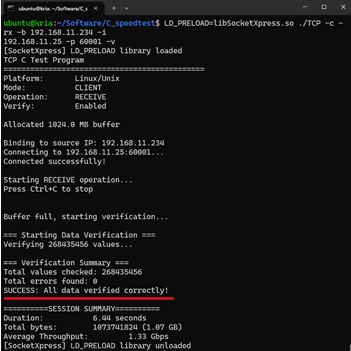
Figure 21 Data verification
test result with SocketXpress
2.2 Compatibility testing
Existing applications can run through SocketXpress using LD_PRELOAD. This section presents the results of running different applications through SocketXpress.
Table 1 summarizes the applications tested with the SocketXpress Library. All applications have been validated for basic usage scenarios. For bug reports or requests for additional application support, please contact us.
Table 1 Applications Tested with SocketXpress Library
|
Application Name |
Version |
Test Scenario |
|
iperf |
2.1.5 |
Established connection to Iperf server and performed bandwidth performance tests |
|
lynx |
2.9.0 |
Browsed web content and navigated to external sites |
|
curl |
7.81.0 |
Retrieved web pages from public websites |
|
telnet |
0.17-44 |
Connected to remote server and executed basic terminal commands |
|
wget |
1.21.2 |
Downloaded web pages and files from remote servers |
|
ssh |
8.9p1 |
Established secure connection to remote server and executed basic commands |
|
scp |
8.9p1 |
SCP file upload and download operations |
|
ftp |
20210827-4 |
FTP file upload and download operations |
|
git |
2.34.1 |
Cloned remote repository and checked out branches |
|
mysql |
8.0.43 |
Connected to MySQL database server and queried data |
|
links |
2.25 |
Browsed web content and navigated to external sites |
The following examples demonstrate SocketXpress functionality with representative applications including Lynx and curl for web content access.
2.2.1 Lynx
Users can browse websites using the Lynx web browser through SocketXpress by execute the following command:
> SOURCE_IP=<TOE IP> LD_PRELOAD=libSocketXpress.so lynx <url>
For example, when visiting https://www.example.com through SocketXpress, the Lynx terminal will render the HTML page for https://www.example.com. Users can select each menu and press Enter to navigate to that page, as shown in Figure 22.
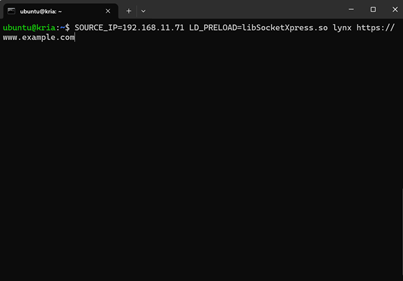
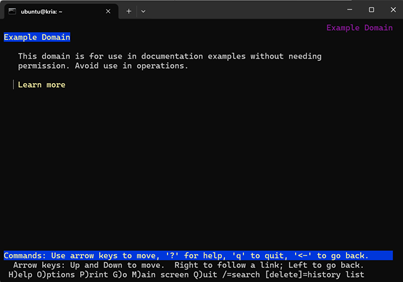
Figure 22 Example Lynx UI browsing with SocketXpress on 10G Ethernet connection
2.2.2 curl
Users can fetch web content using the curl command-line tool through SocketXpress by execute the following command:
> SOURCE_IP=<TOE IP> LD_PRELOAD=libSocketXpress.so curl <url>
In this example is https://www.wttr.in/Tokyo, curl will fetch and display the HTML content as shown in Figure 23
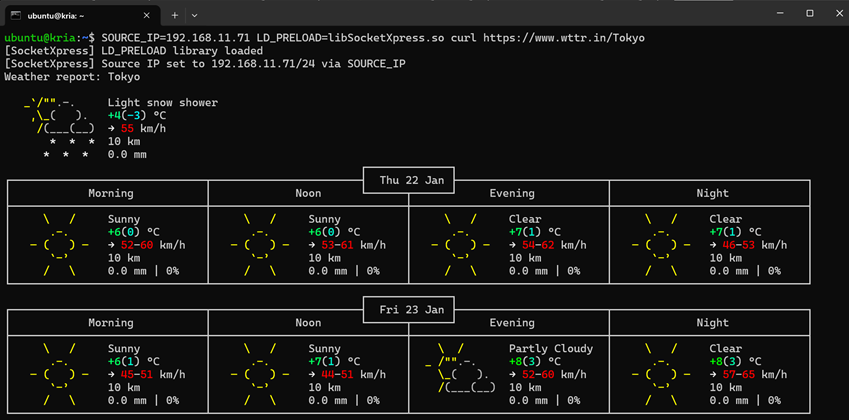
Figure 23 Example curl output fetching with SocketXpress on 10G Ethernet connection
2.2.3 iperf
Users can perform network throughput testing using the iperf tool through SocketXpress. This allows for standardized bandwidth measurements while leveraging hardware acceleration.
Start iperf server on Host PC:
> iperf -l 16k -s <Host IP>
For transmit throughput testing from FPGA, execute the following command:
> LD_PRELOAD=libSocketXpress.so iperf -c <Host IP> -B <TOE IP>
For receive throughput testing on FPGA, execute the following command:
> LD_PRELOAD=libSocketXpress.so iperf -c <Host IP> -B <TOE IP> -R
The iperf client will establish a connection through the TOE10GLL-IP and display real-time throughput measurements. Users can observe the bandwidth performance with hardware acceleration enabled, as shown in Figure 24.
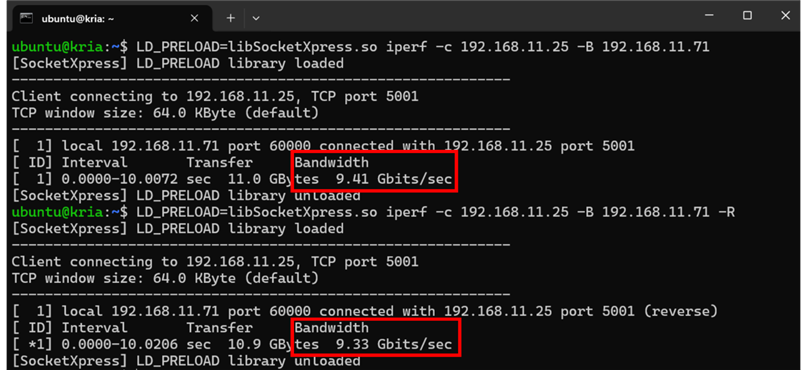
Figure 24 iperf throughput testing with SocketXpress on 10G Ethernet connection
3 Revision History
|
Revision |
Date (D-M-Y) |
Description |
|
1.00 |
23-Jan-26 |
Initial version release |